In this article:
- Installing plugins
- Adobe Photoshop
- Adobe Premiere
- Adobe Lightroom
- Adobe Lightroom Classic
- Adobe Illustrator
- Adobe After Effects
- Adobe Audition
Installing plugins - General Information
Before installing any plugin, it is advised to install the application to which the plugin pertains. If this order is not followed, it will be necessary to reinstall the plugin.
Please note that Adobe plugins work only with applications installed via Creative Cloud.
Adobe Photoshop
How do I connect to the Photoshop plugin?
After you’ve installed the plugin from Marketplace, open Photoshop again and the plugin will automatically connect to the app. To verify, click on Photoshop’s Plugin Menu, select the “Logitech” item, and select Photoshop Plugin. The small panel that opens will show Connected and the version number.
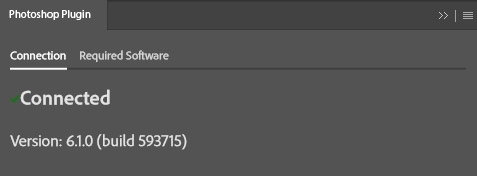
Note: To see Photoshop’s user actions ( = macros) as assignable actions in the Logi Options+ UI, Photoshop application must be running / open. If the Photoshop application is not running, macro actions are not listed (as they cannot be retrieved from a closed application).
Adobe Premiere
How do I connect to the Premiere plugin?
You’ll first need to activate your device as a control surface (device) in Premiere. This has only to be done once.
To activate:
-
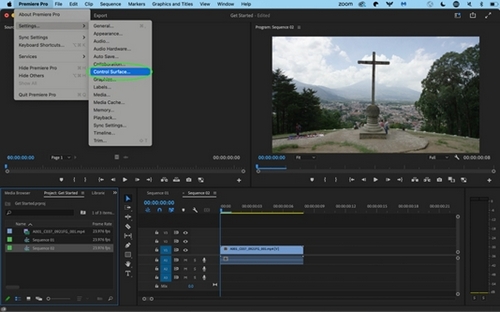
Open the Control Surface menu:
- Mac: Premiere > SETTINGS > CONTROL SURFACE
- Windows: EDIT > PREFERENCES > CONTROL SURFACE
-
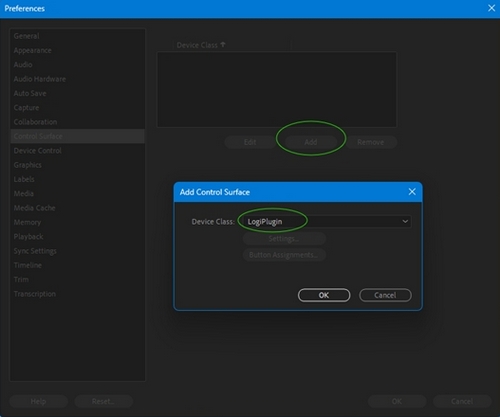
Click on ADD, select “LogiPlugin”, then click OK.
Adobe Lightroom
How do I connect to the Lightroom plugin?
Note: This plugin works only with Adobe Lightroom installed via Creative Cloud.
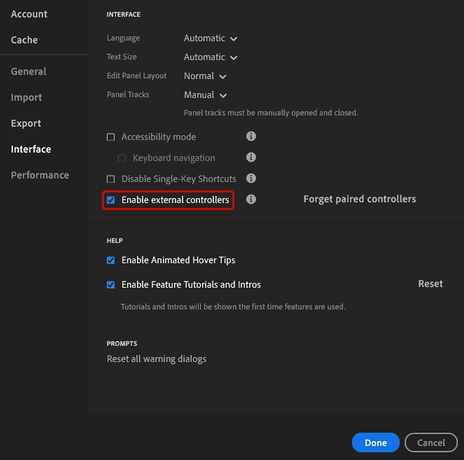
To connect the Adobe Lightroom plugin with the target application you need to first allow external connections from the Lightroom application settings.
-
Go to Lightroom: Edit > Preferences > Interface. Click on the check box next to Enable external controllers to enable the controllers.
-
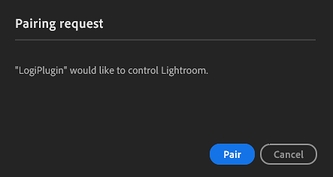
Restart the Lightroom application. Click Pair in the pairing request pop-up window. This will allow LogiPlugin to control Lightroom.
Adobe Lightroom Classic
How do I connect to the Lightroom Classic plugin?
After you’ve installed the plugin from Marketplace, open Lightroom Classic again and the plugin will automatically connect to the app.
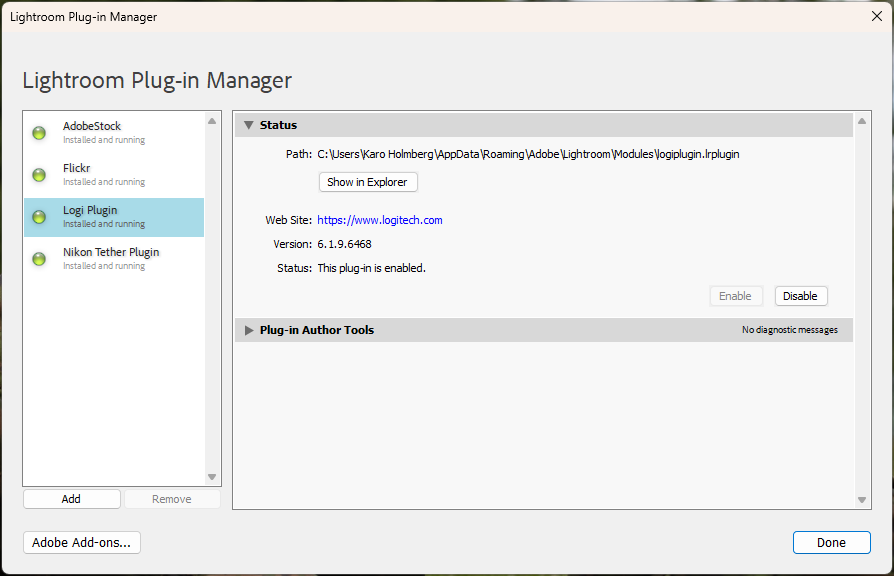
To verify the plugin has been correctly installed, open Lightroom Classic and select File > Plugin Manager. You should see the Logi Plugin listed as active and status states “This plug-in is enabled.”.
What are modes in Lightroom Classic and how do I use them?
Some applications, like Lightroom Classic, have different modes (or “modules”) within the application itself. Option+ supports two most used modes: Library and Develop.
Both Library and Develop modes contain specific actions that do not work if another mode is active. Logi plugin for Lightroom Classic follows these modes automatically and offers a suitable set of actions to be mapped.
Think modes as multiple profiles within the same application: You have a separate profile for Library mode and profile for Develop mode.
In addition to the two main modes (Library and Develop) Lightroom Classic has four tools under Develop mode (listed below):
- Library Mode
-
Develop Mode
- Crop Overlay
- Remove
- Red Eye Correction
- Masking
These tools are submodes. All Develop mode actions are also available in each of the submodes (e.g. you can adjust Exposure while Crop Overlay is active).
For each mode you can create your own mapping based on your workflow. E.g. for Crop Overlay mode you can assign specific Crop Overlay actions from the action list (Image: see red dots).
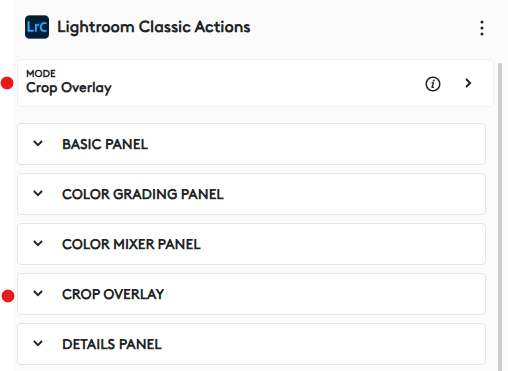
Note: Only the actions that work within each mode or submode are available on the actions list.
Where can I find my Develop Presets - actions?
Lightroom Classic’s Develop Presets are retrieved by Options+ in three cases:
- Lightroom Classic is launched (Options+ process needs to be running, but Options+ UI does not need to be visible)
- Options+ is launched and Lightroom Classic is already running
- “Update Develop Presets” is activated in Lightroom Classic (from “Help\Plug-in Extras” menu while Options+ is running)
Develop Presets are visible in the Options+ UI under Lightroom Classic plugin. Scroll down the actions list to locate the “Develop Presets” group and the configurable “Apply Develop Preset” action. You must first drag the action to a button on the device and then choose the preset folder and the preset you want to use for this action.
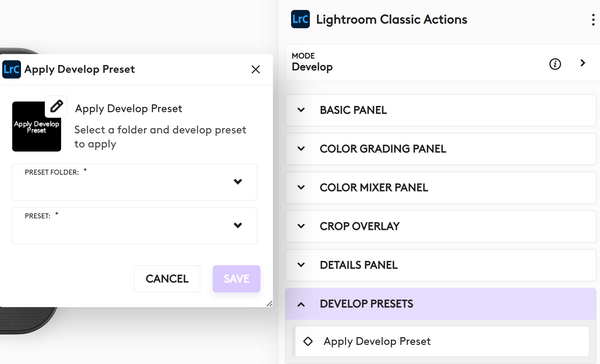
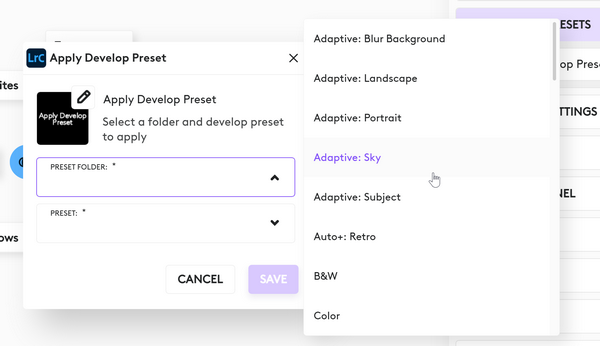
You can assign each of the develop preset actions from any of the preset folders individually to your device.
Note: Within Lightroom Classic, develop presets are available only under the Develop Module but with the Lightroom Classic plugin you can use develop presets also in the Library Module.
How are Lightroom Develop Presets Loaded in Options+?
Options+ automatically retrieves your Lightroom develop presets when you first launch the Lightroom Classic application. The retrieved list is saved for future use. To optimize performance and prevent slowdowns in Lightroom Classic, subsequent launches use the saved list of your preset list rather than retrieving it again. If you create new presets in Lightroom Classic, you must manually refresh the presets list in order to make them visible in the Lightroom Classic plugin action list in Options+ .
Updating Your Develop Presets List
If you've hidden, modified, reorganized, or created new develop presets and want these changes reflected in Options+, you'll need to manually refresh the develop preset from Lightroom Classic. Follow the instructions below to update your preset list.
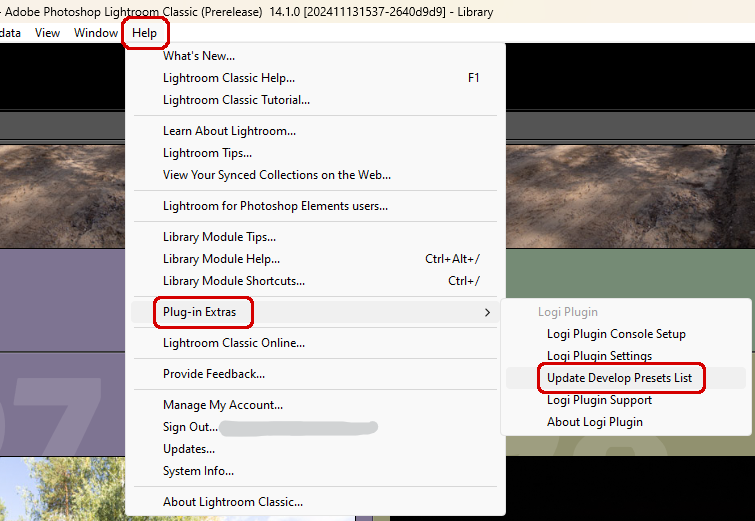
- Open “Help” menu from within Lightroom Classic
- Select “Plug-in Extras”
- Select “Update Develop Presets List
- Open Options+ and assign new develop presets to your device
Adobe Illustrator
How do I connect to the Illustrator plugin?
After you’ve installed the plugin from Marketplace, open Illustrator again and the plugin will automatically connect to the app.
Adobe After Effects
How do I connect to the After Effects plugin?
After you’ve installed the plugin from Marketplace, open After Effects again and the plugin will automatically connect to the app.
Adobe Audition
How do I connect to the Audition plugin?
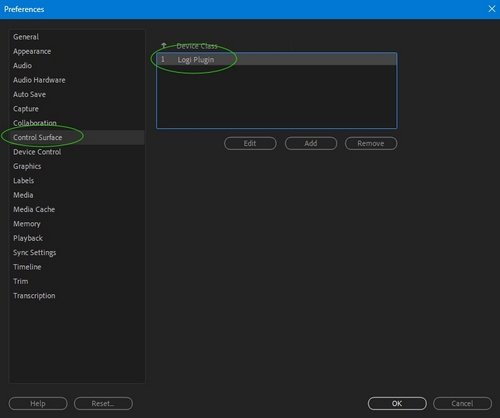
After you’ve installed the plugin from Marketplace, open Audition to activate it as a Control Surface in the Audition preferences:
Go to Audition: Preferences > Control Surface > Add Logi Plugin
Důležitá poznámka: Nástroj pro aktualizaci firmwaru již není společností Logitech podporován ani udržován. Důrazně doporučujeme pro vaše podporovaná zařízení Logitech použít aplikaci Logi Options+. Jsme tu, abychom vám při tomto přechodu pomohli.
Důležitá poznámka: Aplikace Logitech Preference Manager již není společností Logitech podporována ani udržována. Důrazně doporučujeme pro vaše podporovaná zařízení Logitech použít aplikaci Logi Options+. Jsme tu, abychom vám při tomto přechodu pomohli.
Důležitá poznámka: Aplikace Logitech Control Center již není společností Logitech podporována ani udržována. Důrazně doporučujeme pro vaše podporovaná zařízení Logitech použít aplikaci Logi Options+. Jsme tu, abychom vám při tomto přechodu pomohli.
Důležitá poznámka: Nástroj Logitech Connection Utility již není společností Logitech podporován ani udržován. Důrazně doporučujeme pro vaše podporovaná zařízení Logitech použít aplikaci Logi Options+. Jsme tu, abychom vám při tomto přechodu pomohli.
Důležitá poznámka: Software Unifying již není společností Logitech podporován ani udržován. Důrazně doporučujeme pro vaše podporovaná zařízení Logitech použít aplikaci Logi Options+. Jsme tu, abychom vám při tomto přechodu pomohli.
Důležitá poznámka: Software SetPoint již není společností Logitech podporován ani udržován. Důrazně doporučujeme pro vaše podporovaná zařízení Logitech použít aplikaci Logi Options+. Jsme tu, abychom vám při tomto přechodu pomohli.
Časté otázky
V této sekci nejsou dostupné žádné produkty
Pro tento produkt nejsou k dispozici žádné Soubory ke stažení
Pro tuto verzi nejsou k dispozici žádné soubory ke stažení.
Compatible Product
