NOTE: The MX Anywhere 2 wireless mouse uses Bluetooth Smart technology and is not compatible with Windows 7 computers that do not support Bluetooth Smart.
Connect to Windows 8
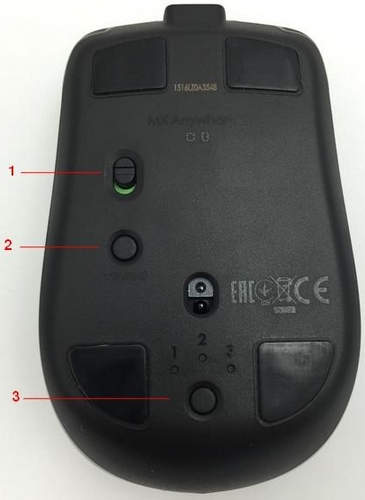
1 — Power switch
2 — Connect button
3 — Device selector button
To connect your mouse to a computer running Windows 8:
- Turn the mouse on by sliding the power switch on the bottom of the mouse up.
- Using the device selector button, select 1, 2, or 3. You can save up to three devices to memory on the mouse.
NOTE: If the light blinks rapidly when you first select it, it’s ready to connect. If so, go to step 4. Otherwise, continue to step 3. - Press and hold the connect button on the mouse until the number you selected starts blinking rapidly.
- Add the mouse to your computer:
- On the Start screen, right-click in an empty space, and then select All apps > Control Panel > Devices and Printers
NOTE: If you can't locate Devices and Printers, set the Control Panel to View by: Small icons. You should then be able to see all Control Panel items. - In the Devices and Printers window, click Add a device.

- Choose MX Anywhere 2 from the Devices list and then click Next.
A new device configuration window will appear while the connection is configured.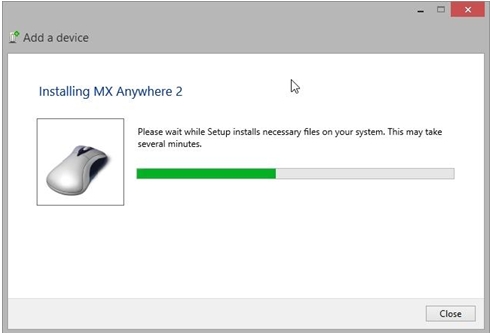
- When the pairing is complete, the new device configuration window will automatically close. The MX Anywhere 2 will be visible in the Devices list in the Devices and Printers window.
NOTE: If the MX Anywhere 2 is already paired but has a problem connecting, remove it from the Devices list and then follow the instructions above to re-connect it.
Connect to Mac OS X 10.10 or later
1 — Power switch
2 — Connect button
3 — Device selector button
To connect your mouse to a Mac:
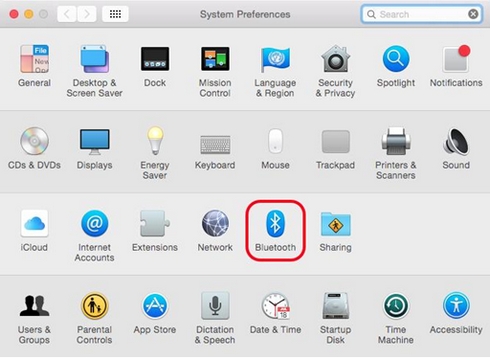
- From the Apple menu, select System Preferences.
- In System Preferences, click the Bluetooth icon.
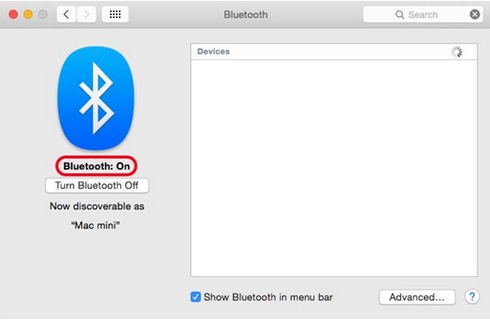
- In the Bluetooth pane, make sure that Bluetooth is On.
- Turn the mouse on by sliding the power switch on the bottom of the mouse up.
- Using the device selector button, select 1, 2, or 3. You can save up to three devices to memory on the mouse.
- Press the connect button on your mouse to start pairing.
- In the Bluetooth window on your Mac, click Pair to complete pairing.

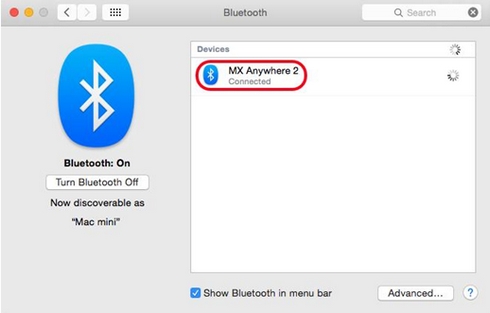
- Once the pairing is complete, MX Anywhere 2 will show as Connected.
Σημαντική σημείωση: Το Firmware Update Tool δεν υποστηρίζεται ούτε συντηρείται πλέον από τη Logitech. Συνιστούμε να χρησιμοποιήσετε ανεπιφύλακτα το Logi Options+ για τις δικές σας υποστηριζόμενες συσκευές Logitech . Είμαστε εδώ για να σας βοηθήσουμε κατά τη διάρκεια αυτής της μετάβασης.
Σημαντική σημείωση: Το Logitech Preference Manager δεν υποστηρίζεται ή συντηρείται πλέον από τη Logitech. Συνιστούμε να χρησιμοποιήσετε ανεπιφύλακτα το Logi Options+ για τις δικές σας υποστηριζόμενες συσκευές Logitech . Είμαστε εδώ για να σας βοηθήσουμε κατά τη διάρκεια αυτής της μετάβασης.
Σημαντική σημείωση: Το Logitech Control Center δεν υποστηρίζεται ούτε συντηρείται πλέον από τη Logitech. Συνιστούμε να χρησιμοποιήσετε ανεπιφύλακτα το Logi Options+ για τις δικές σας υποστηριζόμενες συσκευές Logitech . Είμαστε εδώ για να σας βοηθήσουμε κατά τη διάρκεια αυτής της μετάβασης.
Σημαντική σημείωση: Το Logitech Connection Utility δεν υποστηρίζεται ή συντηρείται πλέον από τη Logitech. Συνιστούμε να χρησιμοποιήσετε ανεπιφύλακτα το Logi Options+ για τις δικές σας υποστηριζόμενες συσκευές Logitech . Είμαστε εδώ για να σας βοηθήσουμε κατά τη διάρκεια αυτής της μετάβασης.
Σημαντική σημείωση: Το λογισμικό Unifying δεν υποστηρίζεται ή συντηρείται πλέον από τη Logitech. Συνιστούμε να χρησιμοποιήσετε ανεπιφύλακτα το Logi Options+ για τις δικές σας υποστηριζόμενες συσκευές Logitech . Είμαστε εδώ για να σας βοηθήσουμε κατά τη διάρκεια αυτής της μετάβασης.
Σημαντική σημείωση: Το λογισμικό SetPoint δεν υποστηρίζεται ούτε συντηρείται πλέον από τη Logitech. Συνιστούμε να χρησιμοποιήσετε ανεπιφύλακτα το Logi Options+ για τις δικές σας υποστηριζόμενες συσκευές Logitech . Είμαστε εδώ για να σας βοηθήσουμε κατά τη διάρκεια αυτής της μετάβασης.
Συνήθεις ερωτήσεις
Δεν υπάρχουν διαθέσιμα προϊόντα για αυτήν την ενότητα
Δεν υπάρχουν στοιχεία λήψης για αυτό το προϊόν
Δεν υπάρχουν στοιχεία λήψης για αυτήν την έκδοση.
Compatible Product
