- Make sure the C920s camera is connected to your computer.
- Launch LGS, and select the HD Pro Webcam C920s.
- Click on the Webcam Settings icon.

- Webcam Settings
- Logitech Webcam Properties (Advanced)
- Camera Preview

Webcam Settings
The Webcam Settings panel lets you adjust the camera’s brightness, contrast, saturation, zoom, and advanced settings.
To customize your webcam settings:
- Brightness — Click and drag the slider to the right to increase and to the left to decrease.
- Contrast — Click and drag the slider to the right to increase and to the left to decrease.
- Saturation — Click and drag the slider to the right to increase and to the left to decrease.
- Zoom — Click and drag the slider upwards to zoom in and downwards to zoom out.
-
Viewport — While zoomed in, click and drag the grey rectangle to move the camera lens up, down, left, or right.
NOTE: Click on Default to restore all settings to their original values. - Advanced — You can customize additional settings for your camera by clicking on Advanced.
Logitech Webcam Properties
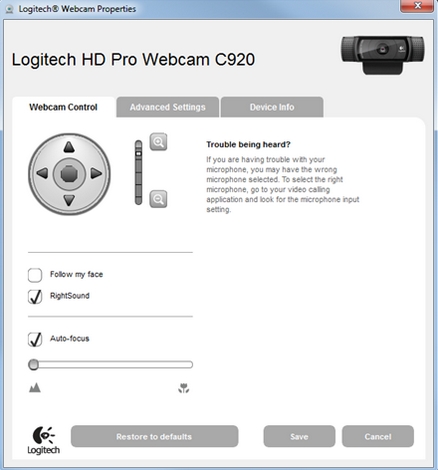
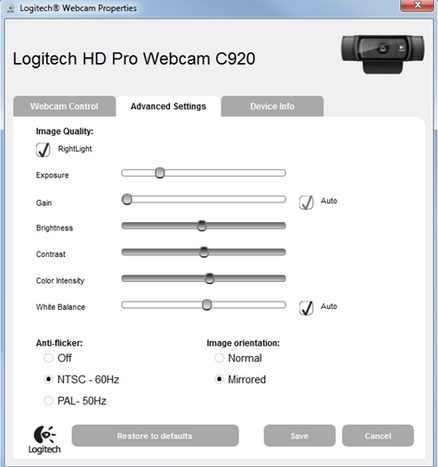
The Logitech Webcam Properties (Advanced) window has 3 tabs:
- Webcam Control
- Advanced Settings
- Device Info

Pan/Tilt controls — Use the left, right, up, and down arrows to fine-tune the field of vision.
Follow my face — Click on the checkbox to allow the camera lens to automatically pan and tilt in order to follow your face.
RightSound — RightSound is enabled by default on the HD Pro Webcam C920s. RightSound technology recognizes and eliminates repeated sound waves before they are reproduced as feedback or echo. To disable this option, click on the RightSound checkbox.
Auto-focus — Auto-focus is enabled by default on the HD Pro Webcam C920s. You can also manually adjust the depth of field on your camera. Click on the checkbox next to Auto-focus, then drag the slider to the right to increase and to the left to decrease.
Advanced Settings:

- RightLight — RightLight is enabled by default, which automatically improves image quality under a wide variety of lighting conditions. To disable RightLight, click on the check box.
- Exposure — You can adjust the amount of light that reaches the camera sensor. Click and drag the slider to the right to increase and to the left to decrease.
- Gain — Gain is automatically adjusted on the HD Pro Webcam C920s by default. You can use gain to amplify the intensity of the image or video pixels and brighten your image. To manually adjust the camera gain, first click on the checkbox, and then click and drag the slider to the right to increase and to the left to decrease.
- Brightness, Contrast, Color Intensity — These three sliders mirror the ones in the LGS Webcam Settings panel. Click and drag the slider to the right to increase and to the left to decrease.
- White Balance — This setting is automatically adjusted on the HD Pro Webcam C920s by default. To manually adjust the white balance, click on the checkbox next to White Balance.
- Anti-flicker — Choose a refresh rate for your display depending on the light in your environment. You can use 60Hz, 50Hz or disable the anti-flicker setting.
- Image Orientation — Choose between normal or mirrored orientation, where left and right will be reversed.
Displays information about the HD Pro Webcam C920s including but not limited to USB Vendor ID, USB Product ID, Firmware version, and Driver Version.
Camera Preview:
The Camera Preview panel shows you how the different webcam settings affect the video feed.
Important Notice: The Firmware Update Tool is no longer supported or maintained by Logitech. We highly recommend using Logi Options+ for your supported Logitech devices. We are here to assist you during this transition.
Important Notice: The Logitech Preference Manager is no longer supported or maintained by Logitech. We highly recommend using Logi Options+ for your supported Logitech devices. We are here to assist you during this transition.
Important Notice: The Logitech Control Center is no longer supported or maintained by Logitech. We highly recommend using Logi Options+ for your supported Logitech devices. We are here to assist you during this transition.
Important Notice: The Logitech Connection Utility is no longer supported or maintained by Logitech. We highly recommend using Logi Options+ for your supported Logitech devices. We are here to assist you during this transition.
Important Notice: The Unifying Software is no longer supported or maintained by Logitech. We highly recommend using Logi Options+ for your supported Logitech devices. We are here to assist you during this transition.
Important Notice: The SetPoint software is no longer supported or maintained by Logitech. We highly recommend using Logi Options+ for your supported Logitech devices. We are here to assist you during this transition.
Frequently Asked Questions
There are no products available for this section
