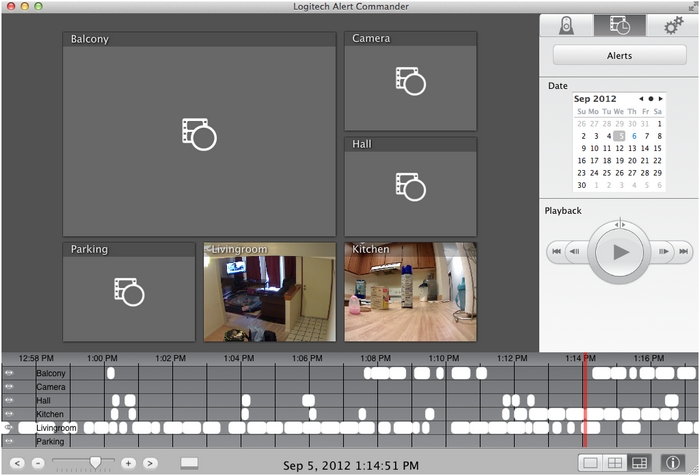
The Playback screen (see the example below) lets you find, view, and manage recorded video clips that are stored on your computer's hard drive.
The Playback panel consists of:

Camera viewing windows
The playback control panel provides multiple options for displaying your videos (see answer 360023186294 for more information):
-
Single camera view shows one camera display.
-
Four cameras view shows up to four cameras.
NOTE: If you have less than four cameras, some screens will appear as blank displays.
-
All cameras view shows up to six cameras.
NOTE: If you have more than six cameras, only six will be displayed at a time. If you have less than six, only active cameras will be displayed (there won't be blank displays).
Each viewing window provides access to different functions for the video. See answer 360023186294 for more information on the controls available with the options bar on the playback screen.

Calendar
The calendar lets you locate and play recorded video clips by browsing through dates in a calendar interface. Click the right arrow to advance one month or the left arrow to go to the previous month.

Click any date on the calendar to view the video recordings for that day (the current day is highlighted in blue). All videos for that day will display in the video timeline window.
NOTE: If you select a day that has no recordings, none will display on the timeline.
Playback controls
After you've selected a video segment you want to view, use the playback controls to play, pause, adjust speed, and step through video segments. When you place your cursor over a control, a tool tip displays the name of the control.

| Playback controls | |
| A | View slow motion (turn jog dial counter-clockwise) |
| B | Video fast motion (turn jog dial clockwise) |
| C | Step back one frame |
| D | Step forward one frame |
| E | Skip to previous video segment |
| F | Skip to next video segment |
| G | Play / Pause video |
Video timeline
The video timeline lets you identify which cameras have recorded video clips, and what time of day the video was taken.
Features of the video timeline include:
-
List of cameras (and their functions)
-
A list of cameras on the network displays on the left side of the video navigation window.
-
By default, all cameras are "Active," and you can view any of their video recordings.
NOTE: You can hide cameras from the video timeline to focus on viewing the video for a specific camera.
-
The eye icon (
 ) to the left of the camera name shows that the camera is active, and its recorded videos will play in the Playback video windows.
 -
To hide a camera and its video recordings, click the eye icon. When a camera is hidden, the eye icon is grayed out (
 ).
).
-
-
Using the red timeline bar
-
When the Playback screen first opens, the vertical red bar in the video segments window is at the current time of the day.
-
When viewing video, the red timeline bar is at the current time of the video when you're watching.
-
Click the red timeline bar and drag it left or right to find the video recorded at a specific time or date.
-
Click anywhere on the window and the red timeline bar will go directly to that spot.

-
| Video timeline features | |
| A | Show or hide the recorded video events for a camera. |
| B | Names of all cameras installed on the network. |
| C | Time of day. |
| D | Transparent marking indicates Alert Commander is still downloading the video clip from your camera. When processing is complete, marking changes to solid. |
| E | White marking represents the length of the video clip, and indicates the clip is uploaded and ready for viewing on your computer. |
| F | Zoom timeline in and out. |
| G | Move back and forward on the timeline. |
| H | Hide or show the timeline. |
| I | The red bar shows the time of day you are currently watching. Click and drag the bar to another time to watch another recording segment. |
Important Notice: The Firmware Update Tool is no longer supported or maintained by Logitech. We highly recommend using Logi Options+ for your supported Logitech devices. We are here to assist you during this transition.
Important Notice: The Logitech Preference Manager is no longer supported or maintained by Logitech. We highly recommend using Logi Options+ for your supported Logitech devices. We are here to assist you during this transition.
Important Notice: The Logitech Control Center is no longer supported or maintained by Logitech. We highly recommend using Logi Options+ for your supported Logitech devices. We are here to assist you during this transition.
Important Notice: The Logitech Connection Utility is no longer supported or maintained by Logitech. We highly recommend using Logi Options+ for your supported Logitech devices. We are here to assist you during this transition.
Important Notice: The Unifying Software is no longer supported or maintained by Logitech. We highly recommend using Logi Options+ for your supported Logitech devices. We are here to assist you during this transition.
Important Notice: The SetPoint software is no longer supported or maintained by Logitech. We highly recommend using Logi Options+ for your supported Logitech devices. We are here to assist you during this transition.
Frequently Asked Questions
There are no products available for this section
