Moving a pointer on iPadOS
iPad OS 13.1 lets you use a mouse as a pointer with the AssistiveTouch feature. This feature is intended to help people who have difficulty using the touch screen, but it can also be useful for advanced users. For example:
-
Getting things done on the go

A Logitech mobile mouse such as MX Anywhere 2S can be a good addition to the Logitech Slim Folio Pro Keyboard Case for productive sessions on the go. The mouse will be quite efficient for text editing, scrolling in spreadsheets and navigating between apps.
-
Working with multiple devices at your desk

Logitech multi-device keyboards and mice allow you to work on multiple computers, and tablets, and switch between them with the press of a button. You can start a report on your computer, and then switch to your iPad to write a quick message.
-
Presenting from your iPad

When presenting with your iPad connected to a large screen, Logitech Spotlight Presentation Remote lets you control your slides and point out precise areas of focus in your presentation by moving the iPadOS pointer. (Note: Logi Options+ app cannot be installed on iPadOS. The Spotlight effect and other software-enabled features are not available on iPad).
How does it work?
The pointer looks like a circle, designed to simulate the touch of a finger. You can use the mouse as if you moved a finger on the screen. Clicking will be like tapping the screen with the finger.
The mouse can be connected using Bluetooth or the wireless USB dongle using a USB adapter. You will need to enable AssistiveTouch in the Accessibility settings. See more setup details below.
Which Logitech mice are supported?
Pointing, clicking, right-click and scrolling are supported on iPadOS 13.1 for most Logitech Bluetooth mice. The supported mice are MX Master 3, MX Master 2S, MX Anywhere 2S, MX Vertical, MX Ergo, M720 Triathlon Mouse, M585, and M350 Pebble Mouse.
NOTE: Logitech Options software and software-related features are not supported on iPadOS.
-
Limitations
Enabling the pointer and the AssistiveTouch requires to go multiple levels into the iPad settings. See the setup instructions below. - iPadOS is enabling pointer movement as an AssistiveTouch feature. This means that the behavior of the pointer will be like moving a finger on the screen, not like using a cursor on a computer.
- Scrolling direction is fixed to "natural scrolling" and cannot be changed. Scrolling doesn’t work in all applications.
Set up and use a Logitech mouse on iPad OS
Make sure you have iPadOS installed on your iPad iPadOS can be installed on the following devices:
- All iPad Pros
- iPad (5th and 6th generation)
- iPad mini (5th generation)
- iPad mini 4
- iPad Air (3rd generation)
- iPad Air 2
Bluetooth Pairing
- Turn on your mouse and do a long-press on the Bluetooth Easy-Switch button.
- The Bluetooth LED will start blinking quickly, indicating your mouse is in discoverable mode.
- Complete the pairing in the Bluetooth settings on your iPad.

Enable the pointer
The pointer is enabled through the AssistiveTouch feature in iPadOS settings. To enable the pointer:
- Go to Settings > Accessibility > Touch.

- Enable AssistiveTouch.

You should see the following appear on your screen:
Pointer circle

The pointer appears when the mouse is connected. You can move this pointer with your mouse. When you click, it will act as a finger doing a tap on the screen
AssistiveTouch button

This is a shortcut to the AssistiveTouch top-level menu and allows you to go to the home screen.

Get the most out of your mouse on iPadOS
Mouse button mapping
By default, the mouse buttons are assigned to the following actions:
| Mouse Button | Button number on iPad OS |
Default Action |
| Left-click | Button 1 | Single-Tap |
| Right-click | Button 2 | Open Menu |
| Scroll wheel press | Button 3 | Home button |
Pointer Settings
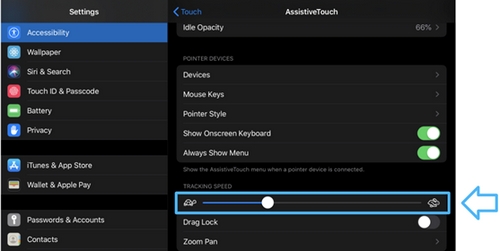
You can change the tracking speed of the pointer:

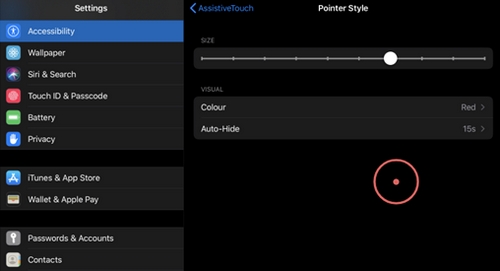
You can also customize the size and color of the pointer:

Customize the mouse buttons
You can customize the actions that will be associated with the different mouse buttons:
-
Go to Settings > Accessibility > Touch > Devices.

-
Select the connected device you want to customize.

You can also customize additional buttons to use the “Back" and "Forward” buttons of your Logitech Mouse to do things like showing Notifications or using the Dock.

Using the on-screen keyboard
Most of our mice have advanced buttons that are recognized by the system as keyboard shortcuts. Due to this, when a mouse is connected, the system believes that an external keyboard is also connected and the on-screen keyboard will disappear.
If you don’t use an external keyboard and want to keep using the on-screen keyboard, make sure that Show Onscreen Keyboard is enabled.

Important Notice: The Firmware Update Tool is no longer supported or maintained by Logitech. We highly recommend using Logi Options+ for your supported Logitech devices. We are here to assist you during this transition.
Important Notice: The Logitech Preference Manager is no longer supported or maintained by Logitech. We highly recommend using Logi Options+ for your supported Logitech devices. We are here to assist you during this transition.
Important Notice: The Logitech Control Center is no longer supported or maintained by Logitech. We highly recommend using Logi Options+ for your supported Logitech devices. We are here to assist you during this transition.
Important Notice: The Logitech Connection Utility is no longer supported or maintained by Logitech. We highly recommend using Logi Options+ for your supported Logitech devices. We are here to assist you during this transition.
Important Notice: The Unifying Software is no longer supported or maintained by Logitech. We highly recommend using Logi Options+ for your supported Logitech devices. We are here to assist you during this transition.
Important Notice: The SetPoint software is no longer supported or maintained by Logitech. We highly recommend using Logi Options+ for your supported Logitech devices. We are here to assist you during this transition.
Frequently Asked Questions
There are no products available for this section
