LEARN MORE ABOUT YOUR PRODUCT
Connect your mouse to your device
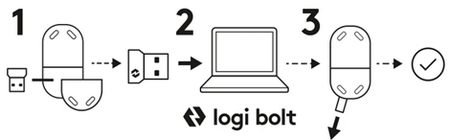
You can pair your mouse to your device using the Bluetooth Low Energy connection or our new Logi Bolt receiver.
To Pair Your Device Through Bluetooth:

Or through Logi Bolt Receiver:
If you want to pair additional devices to your mouse:
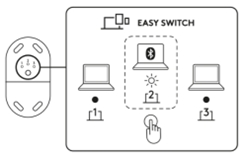 |
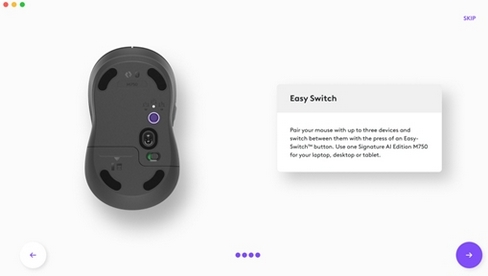
To pair the mouse with an additional device select Channel 2 by a short press (one second) on the connect button under your mouse. When the LED starts blinking the second channel will be ready to pair through a Bluetooth connection (if the LED on Channel 2 does not start blinking, long-press the Connect button for three seconds to activate the pairing mode). To learn how to connect the keyboard using Bluetooth, see the previous connection steps. To toggle between devices, simply short press the connect button between Channel 1, 2, or 3. |
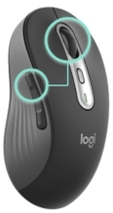
Product Overview
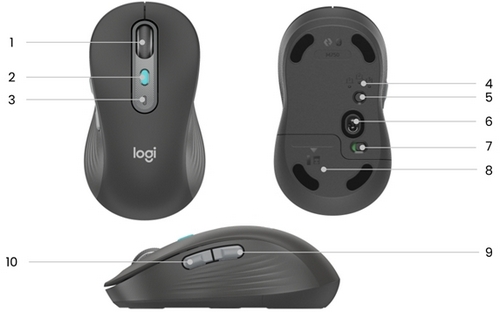
- SmartWheel scroll wheel
- Logi AI Prompt Builder button*
- Battery status LED
- Connection Status LED
- Connect button
- 4000DPI sensor
- On/Off toggle switch
- Battery and receiver compartment
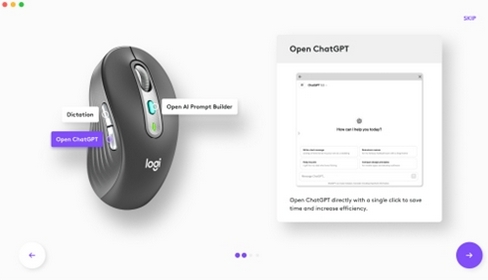
- Open ChatGPT button*
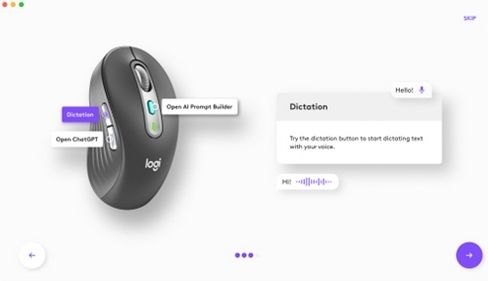
- Dictation button*
*If you are not installing the Logi Options+ App, the 2, 9, and 10 buttons will work respectively as DPI, Back and Forward buttons.
Install Logi Options+App
Download the Logi Options+ App to customize your mouse and benefit from advanced shortcuts and all the possibilities this mouse has to offer. To download and learn more about the full range of features, go to logi.com/optionsplus
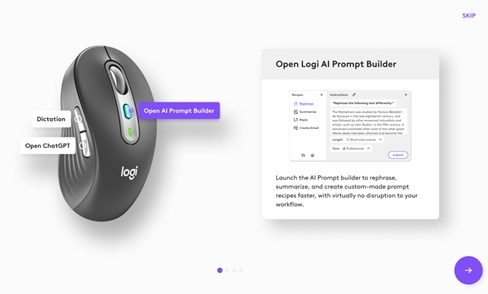
Set up the Logi AI Prompt Builder
Once you have Logi Options+ installed, you can launch the Logi AI Prompt Builder. Click here to learn more about how to use the Logi AI Prompt Builder.
Logi AI Shortcuts On The Signature AI Edition M750 Mouse
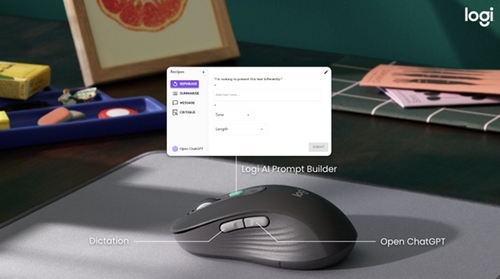
With the Logi Options+ App:
- Top button triggers Logi AI Prompt Builder
- Back button opens ChatGPT
- Forward button activates OS dictation
NOTE: You can re-assign the default functions of your buttons in the Logi Options+ App. To do so, see How to customise the mouse buttons.
SmartWheel
 |
The Signature M750 features SmartWheel scrolling that delivers precision or speed the moment you need it. Seamlessly switch between these two scrolling styles with the flick of your finger.
|
Horizontal Scroll
 |
You can scroll horizontally with your mouse. This is done with a two-button combination: Press and hold one of the side buttons and scroll with the wheel simultaneously. NOTE: The horizontal scroll is ON by default. You can customise this feature on the Point & Scroll tab in the Logi Options+ App. For more detailed information on Horizontal scroll, click here. |
How to customise the mouse buttons
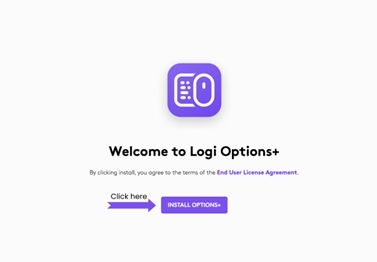
- Download and run the Logi Options+ App.
- An installer window will pop up on your screen — click Install Logi Options+ App.
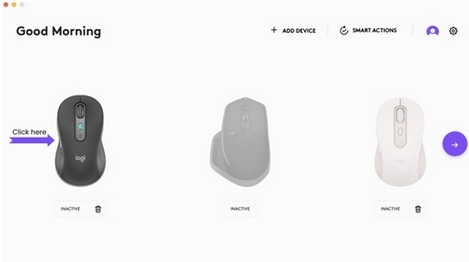
- Once Logi Options+ App is installed, a window will open and you'll be able to see an image of your mouse. Click on it.
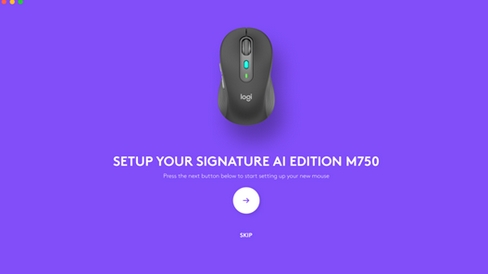
- You will be taken into a quick onboarding process that shows you how to customise your mouse. We highly recommend not to skip it.
- Once you're finished, on the left side of the window, click Buttons.
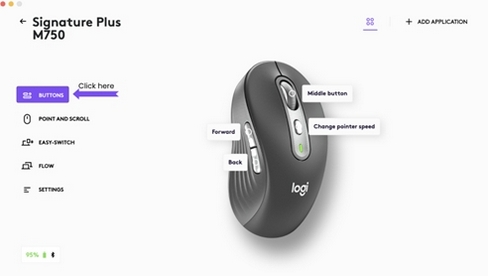
- Click on any of the buttons that you wish to customize.
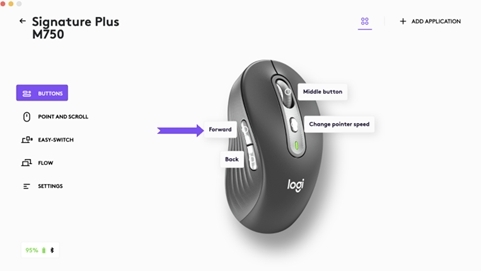
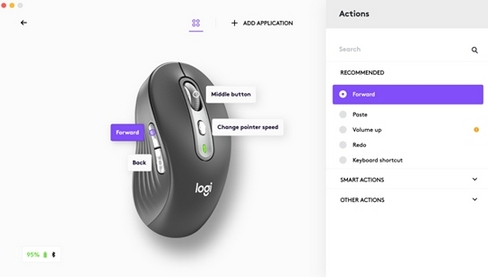
- Select the function you like to set on that button from the options that appear on the right rise of the screen and you are done!
App-Specific Settings
Your mouse buttons can be assigned to perform different functions for different applications. You can assign the side buttons to control volume in Spotify, copy/paste in Microsoft Excel, or undo/redo in Adobe Photoshop.
When you install Logi Options+ App, you can install predefined app-specific settings that will adapt the mouse button behavior to the selected applications.
Here are the app-specific settings we have created for you:
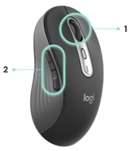 |
1 | 2 | |
| Default settings | Middle Button | Dictation | Open ChatGPT |
| Browser (Chrome, Edge, Safari) | Open link in a new tab | Forward | Back |
| Zoom | Middle Button | Start/Stop Video | Mute / Unmute Microphone |
| Media (Spotify, VLC, Quicktime) | Button | Forward | Back |
| Microsoft Excel | Pan (hold and move the mouse) | Redo | Undo |
| Microsoft Word | Autoscroll | Redo | Undo |
| Microsoft PowerPoint | Pan (hold and move the mouse) | Redo | Undo |
| Adobe Photoshop | Pan (hold and move the mouse) | Redo | Undo |
Each of these settings can be customized manually, for any application.
Assign gestures to the DPI button or any of the side buttons
You can assign the DPI button or any of the side buttons of the mouse to the Gesture Button. This will transform your selected button into a powerful multi-function button allowing you to use gestures for desktop navigation, app management, pan, zoom, and more.
On the Mouse tab, select the button and click on Gesture Button.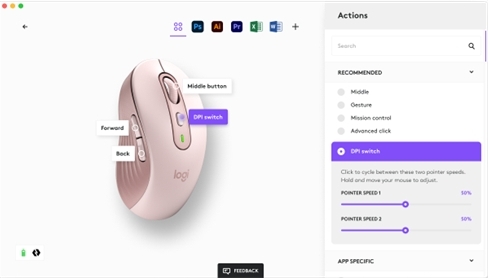
By default, the gesture buttons will allow you to navigate between windows and desktops.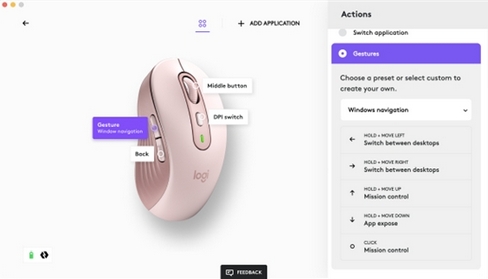
In order to perform the gestures, you will need to hold the button while you move the mouse.
Flow between two computers
You can work on multiple computers with one single mouse.
With Logitech Flow, you can use the mouse cursor to move from one computer to the next. You can even copy and paste between computers, and if you have a compatible Logitech keyboard, the keyboard will follow the mouse and switch computers at the same time.
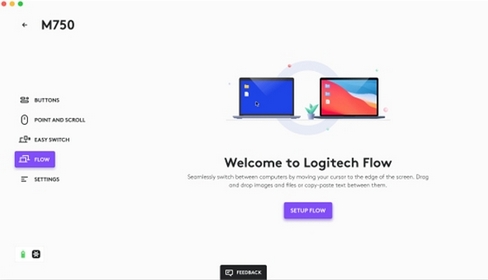
You will need to install Logi Options+ App on both computers and follow these instructions.
Check Battery Status
 |
The LED on the top of the mouse indicates battery status. You can install the Logi Options+ App to receive battery status notifications, including low-charge warnings. |
| LED Color | Status | Time Out | Indications |
| Green | Steady | 5 seconds | From 100% to >5% charge |
| Red | Pulsing | 5 seconds steady, followed by 3 minutes |
Critical level (equivalent to 1-month median use) or below NOTE: The red LED will pulse every time the device wakes up from deep sleep. Deep sleep is reached after 2 hours of inactivity. |
Battery life and replacement
Battery information
- Requires 1 AA alkaline battery
- Expected battery life is up to 24 months
Installing a new battery
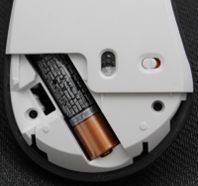 |
Slide the battery compartment cover down and then lift it off. Insert the battery, making sure that it faces the correct direction, and then replace the battery cover. |
Important Notice: The Firmware Update Tool is no longer supported or maintained by Logitech. We highly recommend using Logi Options+ for your supported Logitech devices. We are here to assist you during this transition.
Important Notice: The Logitech Preference Manager is no longer supported or maintained by Logitech. We highly recommend using Logi Options+ for your supported Logitech devices. We are here to assist you during this transition.
Important Notice: The Logitech Control Center is no longer supported or maintained by Logitech. We highly recommend using Logi Options+ for your supported Logitech devices. We are here to assist you during this transition.
Important Notice: The Logitech Connection Utility is no longer supported or maintained by Logitech. We highly recommend using Logi Options+ for your supported Logitech devices. We are here to assist you during this transition.
Important Notice: The Unifying Software is no longer supported or maintained by Logitech. We highly recommend using Logi Options+ for your supported Logitech devices. We are here to assist you during this transition.
Important Notice: The SetPoint software is no longer supported or maintained by Logitech. We highly recommend using Logi Options+ for your supported Logitech devices. We are here to assist you during this transition.
Frequently Asked Questions
There are no products available for this section
There are no Downloads for this Product
There are no Downloads for this Version
Compatible Product
