Harmony 600
Harmony 650
Harmony 700
To customize buttons in an Activity:
- Launch the Logitech Harmony Remote software and login to your account
- Click on the Activities tab
- Click on Customize Buttons for the Activity you wish to customize
- Determine whether you want to customize a Standard or Additional button
- Standard Buttons are the hard buttons on your remote
- Additional Buttons are the buttons on the remote's LCD screen

-
Mapping a command to a Standard button:
- To map a command to a Standard button, from the Button list select the one you wish to customize. In this example, "mute" is used
- From the Device column, select the device that you want to control with this button

- From the Command column select the command you want the button to send from the dropdown list

- Once finished, click on Done at the bottom of the page to save your changes
- Update your remote
Mapping a command to an Additional button on the LCD:
To modify commands on the LCD screen, click on the Additional Buttons tab at the top of the page.
- In the Button column, select the button you wish to customize, from 1 to 4 for each page. The illustration of the remote below shows where each button is placed on the display. In this example, we will assign the Guide command for the PVR to the third button position


- In the text box in the Button column for the third button position, type in "Guide"

- In the Device column, select the device you wish to send the command to. In this example, we will use the PVR

- In the Command column, select the command you want from the dropdown list

Navigating the Additional Buttons page
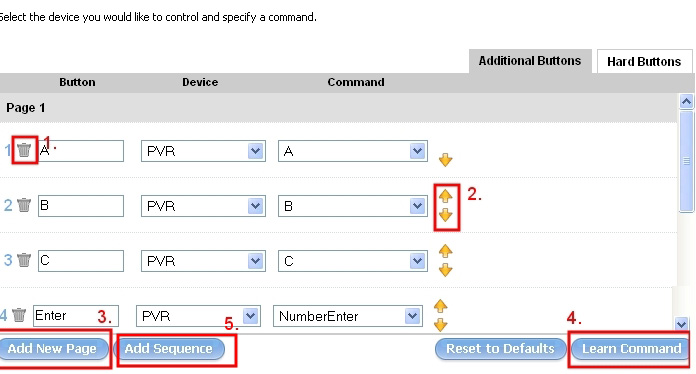
- You can delete a command by clicking the
 trash can icon beside it
 - You can move commands to different button positions by using the
 arrows
 - Click on the Add New Page button to add another page
- Click on the Learn Command button if the command you need is not in the drop-down box. You will be able to capture the button from your original remote
- Click on the Add Sequence button to create a custom sequence of 5 commands for a single button
After making any changes, ensure that you click on the Done button to save the button customizations. The last step is to update your remote. Connect the Harmony remote to your computer’s USB cable and click on Update Remote
Important Notice: The Firmware Update Tool is no longer supported or maintained by Logitech. We highly recommend using Logi Options+ for your supported Logitech devices. We are here to assist you during this transition.
Important Notice: The Logitech Preference Manager is no longer supported or maintained by Logitech. We highly recommend using Logi Options+ for your supported Logitech devices. We are here to assist you during this transition.
Important Notice: The Logitech Control Center is no longer supported or maintained by Logitech. We highly recommend using Logi Options+ for your supported Logitech devices. We are here to assist you during this transition.
Important Notice: The Logitech Connection Utility is no longer supported or maintained by Logitech. We highly recommend using Logi Options+ for your supported Logitech devices. We are here to assist you during this transition.
Important Notice: The Unifying Software is no longer supported or maintained by Logitech. We highly recommend using Logi Options+ for your supported Logitech devices. We are here to assist you during this transition.
Important Notice: The SetPoint software is no longer supported or maintained by Logitech. We highly recommend using Logi Options+ for your supported Logitech devices. We are here to assist you during this transition.
Frequently Asked Questions
There are no products available for this section
There are no Downloads for this Product
There are no Downloads for this Version
Compatible Product
