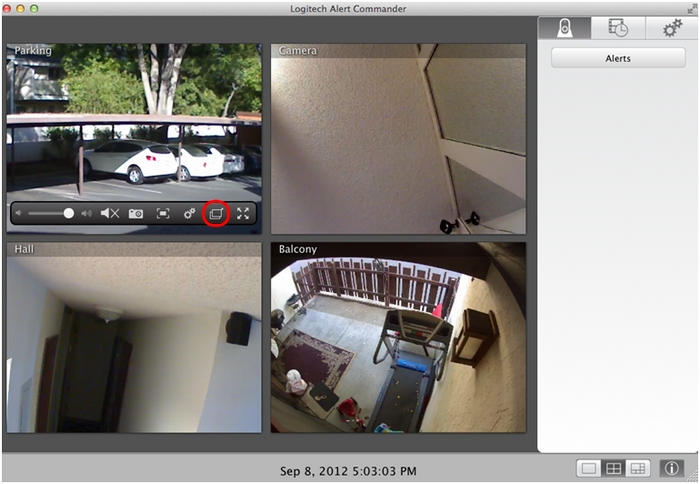
Alert Commander for Mac has two "Camera video window options" bars, one in live-view mode (see answer 360023185994) and the other in playback mode (see answer 360023185994). In live-view mode, the video window options bar lets you do the following:
NOTE: To display the "Camera video window options" bar, hover over any camera display.
Pop a video screen out or in
The Pop video out icon lets you move one or more windows you're monitoring from the Alert Commander window to your desktop. You can then hide the Alert Commander window, leaving the video windows you want to monitor displayed on your desktop.
To pop a window to the desktop:
-
Hover your mouse over the window you want to move to the desktop to display the window controls.
-
Click the Pop video out icon.

The affected window will pop to the right from its original position.

-
Left-click the window and drag it to any place on your desktop.

-
To return the video to the application window, click the Pop video in icon in the Alert Commander window.
NOTE: Video screens will return to their original location in the Alert Commander window.

Adjust pan, tilt and zoom
The digital pan-tilt-zoom (PTZ) control lets you digitally reposition a camera to pan left or right, tilt up or down, or zoom in or out on the camera's view.
The recording resolution of Alert cameras is 960x720. From full zoom-out, you can zoom into the frame 12 steps. You can pan or tilt in increments of 10 pixels. The default position of a camera's view when first starting PTZ is centered with a 1.00:1.00 ratio.
NOTE: Alert cameras only record motion located inside the designated viewing area. Make sure the area you want to monitor and record is within this area.
To adjust the viewing for your camera using Pan-Tilt-Zoom (PTZ):
-
Hover your mouse over the camera you want to adjust.
-
Click the Pan-Tilt-and-Zoom icon.

-
Use the Zoom icon in the Alert Commander window.
NOTE: When you move the slider, the square in the middle of the screen will adjust to show you the viewing area.

-
When you have the area size you want, click anywhere inside the adjustable box and drag it to the desired focus area.
-
Click Save to apply the new setting for your camera.

The camera is now focused on the area you selected.

Take a snapshot
In live-view mode, you can take a snapshot of what the camera is streaming at that moment.
To take a snapshot from your camera:
-
Hover your mouse over the camera you want to take a snapshot from.
-
Click the Snapshot icon.

-
Select a location to save the image.
-
Enter a name for the image and click Save.

Important Notice: The Firmware Update Tool is no longer supported or maintained by Logitech. We highly recommend using Logi Options+ for your supported Logitech devices. We are here to assist you during this transition.
Important Notice: The Logitech Preference Manager is no longer supported or maintained by Logitech. We highly recommend using Logi Options+ for your supported Logitech devices. We are here to assist you during this transition.
Important Notice: The Logitech Control Center is no longer supported or maintained by Logitech. We highly recommend using Logi Options+ for your supported Logitech devices. We are here to assist you during this transition.
Important Notice: The Logitech Connection Utility is no longer supported or maintained by Logitech. We highly recommend using Logi Options+ for your supported Logitech devices. We are here to assist you during this transition.
Important Notice: The Unifying Software is no longer supported or maintained by Logitech. We highly recommend using Logi Options+ for your supported Logitech devices. We are here to assist you during this transition.
Important Notice: The SetPoint software is no longer supported or maintained by Logitech. We highly recommend using Logi Options+ for your supported Logitech devices. We are here to assist you during this transition.
Frequently Asked Questions
There are no products available for this section
