- How to customize buttons in an Activity
- Navigating the Customize Button Page
- The different Activity screens available in Activities on a Harmony 1100
How to customize buttons in an Activity
There are several different types of buttons that are customizable in Activities for your Harmony 1100. The first step in mapping a command is determining what type of button you wish to customize.
-
Hard Buttons: Hard buttons are the physical buttons on your remote like the Volume, Channel and Direction keys. All other physical buttons are used for controlling the Harmony 1100 and are not customizable

-
Virtual Hard Buttons: Virtual hard buttons are buttons that are commonly used and automatically set up for you, like the Play button or a number key

-
Custom buttons: Commands mapped to the LCD screen on the Custom Control
 and to the Left and Right Sidebars. They can be labeled using text (a)or use an icon (b).

Mapping a command to a Hard Button
- Launch the Logitech Harmony Remote software and login to your account
- From the Harmony homepage, click on the
 button for the Activity you wish to customize
 - Click on the
 tab
tab - From the Button list, select the one you wish to customize. In this example, we will set the Mute button to send the "mute" command for the Amplifier when pressed

- From the Device column, select the device that you want to control with this button

- From the Command column select the command you want the button to send from the dropdown list

After making any changes, ensure that you click on the  button to save the button customizations. The last step is to update your remote. Connect the Harmony 1100 to your computer’s USB cable and click on the
  button on the Harmony homepage
Mapping a command to a Virtual Hard Button
Depending on the Activity you are in, different virtual buttons are provided for you to customize (Play, Fast Forward, numbers 0-9, DVR controls...). These buttons are automatically assigned for you, but can be modified if desired.To customize a Virtual Hard Button:
- Launch the Logitech Harmony Remote software and login to your account
- From the Harmony homepage, click on the
 button for the Activity you wish to customize
 - Select the Activity screen you wish to customize by clicking on the appropriate tab.
For this example, we will click on the Transport
 tab
tab - From the Button list, select the one you wish to customize. In this example, we will set the onscreen Play button to send the "play" command for the DVD player when pressed

- From the Device column, select the device that you want to control with this button

- From the Command column select the command you want the button to send from the dropdown list

 button to save the button customizations. The last step is to update your remote. Connect the Harmony 1100 to your computer’s USB cable and click on the
  button on the Harmony homepage
Mapping a command to a Custom Button
Custom buttons are buttons that you name yourself or customize with an icon. They appear on the Sidebars or on the- Launch the Logitech Harmony Remote software and login to your account
- From the Harmony homepage, click on the
 button for the Activity you wish to customize
 - Select the Activity screen you wish to customize by clicking on the appropriate tab.

In this example, we will assign the Eject command for the DVD Player to the first position on the Left Sidebar of the Numeric Entry screen
 - In the Button column, select the button you wish to customize, either on the sidebars or in the main area of the Custom buttons screen.

- From the Device column, select the device that you want to control with this button

- From the Command column select the command you want the button to send from the dropdown list

- You have the choice of either labelling the button or assigning an icon. To label the button, under Button, enter the name you wish to see appear on the LCD screen of the remote. To assign an icon to the button instead, please skip to the next step. If you prefer to simply name the command and not assign an icon please go to Step 10
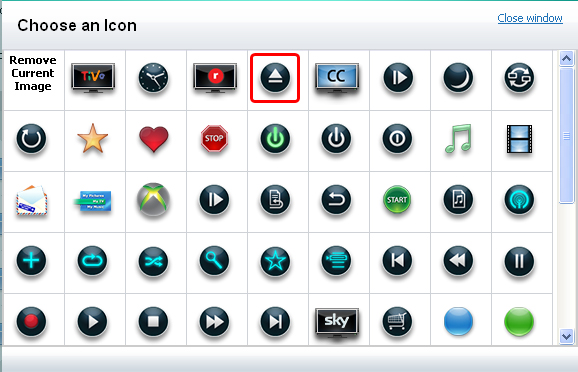
To assign an icon to a button in either the Sidebars or the Custom Buttons screen, please follow these steps:
- Click on the
 button

- Click on the icon you want from the list provided to select it

The icon should now be assigned

-
After making any changes, ensure that you click on the
 button to save the button customizations.
 - The last step is to update your remote. Connect the Harmony 1100 to your computer’s USB cable and click on the
 button on the Harmony homepage
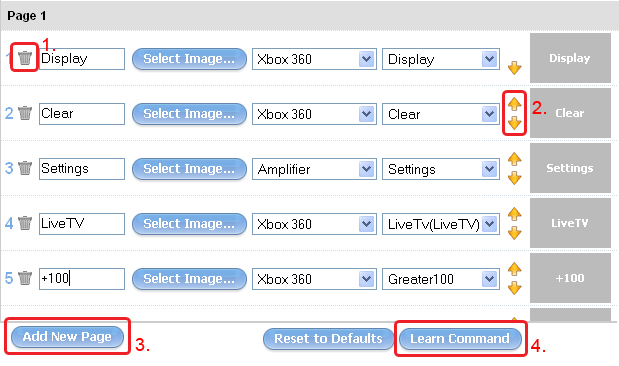
Navigating the Customize Buttons page
- To delete a button, click on the
 trash can icon beside it
 - You can move commands to different button positions by using the
 arrows
 - Click on the
 button to add another page of buttons on the Custom Control screen
 - Click on the
 button if the command you need is not in the drop-down box. You will be able to capture the button from your original remote. For more information, please see article 360023383793 - Learning a command from your original remote to the Harmony 1100
If a command isn't mapped correctly for a specific device in Device mode please see article 360023383793 - How to customize buttons in Device mode for a Harmony 1100
Activity Screens
Activities can have up to four different screens of buttons, the Transport screen, the Number pad screen, the Favorite Channels screen and the additional commands screen. There are many different buttons that can be customized within these screens, from commands on the sidebars, to buttons like Play and Pause.
Transport
Play, Pause, Stop, Replay, Record are examples of some of the buttons that will be displayed or when you are in Activities such as Watch TV or Play a CD.

Depending on the Activity, this icon will display a numeric or alpha-numeric keypad to change channels, CDs, and more.

Find secondary Activity controls depending on the Activity, as well as add your own customized buttons.

In the Watch TV Activity, this icon will list the favorite channels. To use this feature, you must use the remote control software to set up favorite channels.

In Play a Game Activities, this screen allows you to map buttons to control your game system.

Sidebars
On every Activity screen it is possible to customize the left and right sidebars. When mapping a command to the sidebars, the order goes from top to bottom, as indicated.

Important Notice: The Firmware Update Tool is no longer supported or maintained by Logitech. We highly recommend using Logi Options+ for your supported Logitech devices. We are here to assist you during this transition.
Important Notice: The Logitech Preference Manager is no longer supported or maintained by Logitech. We highly recommend using Logi Options+ for your supported Logitech devices. We are here to assist you during this transition.
Important Notice: The Logitech Control Center is no longer supported or maintained by Logitech. We highly recommend using Logi Options+ for your supported Logitech devices. We are here to assist you during this transition.
Important Notice: The Logitech Connection Utility is no longer supported or maintained by Logitech. We highly recommend using Logi Options+ for your supported Logitech devices. We are here to assist you during this transition.
Important Notice: The Unifying Software is no longer supported or maintained by Logitech. We highly recommend using Logi Options+ for your supported Logitech devices. We are here to assist you during this transition.
Important Notice: The SetPoint software is no longer supported or maintained by Logitech. We highly recommend using Logi Options+ for your supported Logitech devices. We are here to assist you during this transition.
Frequently Asked Questions
There are no products available for this section
