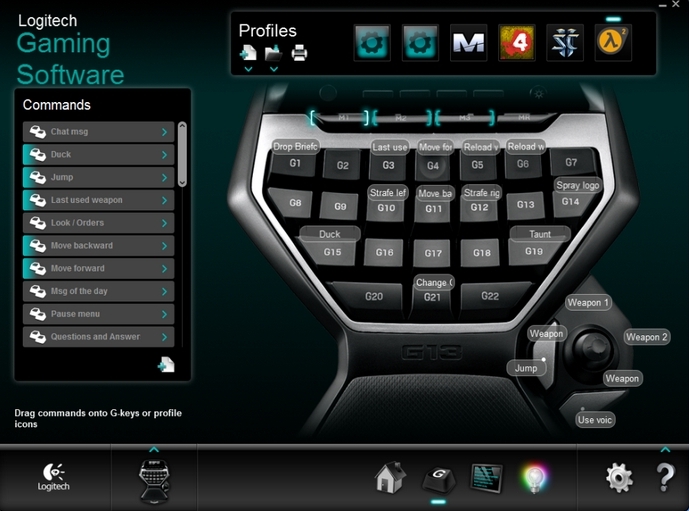
To create and assign macros for the G-Keys on your G-Series keyboard, first you need to set up a profile for each game you want to use macros with. See Knowledge Base article 360023399253 for help with setting up profiles.
There are two ways to create macros for your G-Series keyboard:
Programming macros in the software
To program macros directly in the Logitech Gaming Software:
-
Click on the profile you want to edit. For this example, we'll use Team Fortress 2.

-
To create a macro or other key function, select "Add Function" in the Commands list.

-
Click Multi Key in the left pane of the window that displays.


-
Enter a name for the Macro. For this example, we'll create one called "Spy is in the base!"
-
When you're ready to begin, click "Start Recording".
NOTE: For this macro, we'll use the following commands:
-
"u" - This is used by some games for team-only chat.
-
"Spy is in the base!!" - This is the text we want to broadcast.
-
[Enter] - Pressing the Enter key is required to send the message.
When programming macros, it's important to type as you normally would in a game. The above macro was typed out just as if would have been if the game was actually being played. The "u" was pressed, next "Spy is in the base!!" was typed out, and then [Enter] was pressed.

The Gaming Software generates a down arrow every time a key is pressed down and an up arrow when the key is released. So, in our example, the "!!" generates when the Shift key is pressed and held down, "1" is pressed, "1" is pressed again, and then the Shift key is released. The "!!" doesn't show on-screen because only the actual keystrokes display in macros, rather than the symbols that result from them.
NOTE: Refer to your game's instructions for more help with which command keystrokes you can use.
-
-
Click OK when you're finished.
-
Drag your new macro over from the left pane to the G-Key you want to assign it to.

NOTE: For some games, especially online games, you may have to introduce timing delays to accommodate for the game's behavior. To make the above macro function correctly, a 20 millisecond delay between the "u" and the message had to be introduced. For help with adding time delays to your macros, see Knowledge Base article 360023399253
Creating macros in-game using the MR key
Before you starting recording macros in-game:
-
Launch the Logitech Gaming Software (Start > Logitech > Logitech Gaming Software 7.x).
-
In the Logitech Gaming Software interface, click on the gear icon in the lower right.

-
In the pop-up window that displays, select "Record delays during quick macro creation" and then click OK.

Your MR key is now ready to record, not only key presses, but the exact amount of time between each event. This is useful for recording complex macros with specific timing. You won't need to complete the above process again. To tune the timing after completing a macro, see Knowledge Base article 360023399253
To record macros in-game:
-
Choose the profile for the game you want to quick-record a macro for. If you don't have a profile created, see Knowledge Base article 360023399253 for instructions on how to create one.
- Start the game you want to create the macro for.
-
Once you're in-game, press the MR key on your G-Series keyboard to begin the macro-record procedure.
- Press the G-Key you want to quick-record the macro to and then program it while you're playing your game.
NOTE: The Logitech Gaming Software will record all keystrokes, along with the timing between them. The software won't record mouse button presses, but you can add those later in the software.
-
Press the MR key again once you're done programming. This will save the macro to the key. The macro will now be created and assigned to the G-Key you selected on your keyboard.
-
After you're done programming, you can reenter the Logitech Gaming Software to change the name.
NOTE: All quick macros are recorded as "Quick Macro" and will be associated with the G-Key that you pressed.

-
Double-click on the assigned key, and you'll have the option to change the name of the macro. Give the quick macro a descriptive name and click OK.


NOTE: To add mouse clicks to your macro, see Knowledge Base article 360023399253.
Important Notice: The Firmware Update Tool is no longer supported or maintained by Logitech. We highly recommend using Logi Options+ for your supported Logitech devices. We are here to assist you during this transition.
Important Notice: The Logitech Preference Manager is no longer supported or maintained by Logitech. We highly recommend using Logi Options+ for your supported Logitech devices. We are here to assist you during this transition.
Important Notice: The Logitech Control Center is no longer supported or maintained by Logitech. We highly recommend using Logi Options+ for your supported Logitech devices. We are here to assist you during this transition.
Important Notice: The Logitech Connection Utility is no longer supported or maintained by Logitech. We highly recommend using Logi Options+ for your supported Logitech devices. We are here to assist you during this transition.
Important Notice: The Unifying Software is no longer supported or maintained by Logitech. We highly recommend using Logi Options+ for your supported Logitech devices. We are here to assist you during this transition.
Important Notice: The SetPoint software is no longer supported or maintained by Logitech. We highly recommend using Logi Options+ for your supported Logitech devices. We are here to assist you during this transition.
Frequently Asked Questions
There are no products available for this section
