Customizing Audio Experience
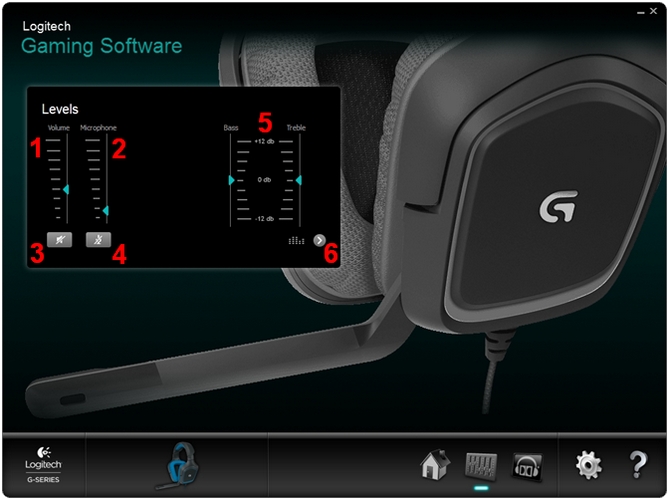
The Audio Experience panel provides both basic and advanced audio output-level controls, as well as microphone input-level controls.
-
Volume
Use the Volume slider to adjust the audio output levels. The incremental adjustments range from 0 to 100.
NOTE: Volume adjustments made on the physical volume control dial will be subject to the master volume adjustment in Logitech Gaming Software. For example, setting the volume slider to 50 will become the maximum volume adjustable through the volume dial on the headset cord. -
Microphone Volume
Use the Microphone slider to adjust the voice input levels. The incremental adjustments range from 0 to 100. -
Volume Mute
Click the Volume Mute button located under the Volume slider to mute audio output.
NOTE: The Volume Mute button will appear lit when mute is enabled. -
Microphone Mute
Click the Microphone Mute button located under the Microphone slider to mute the voice input. The mute button will appear lit when mute is enabled.
NOTE: Mute control on the physical microphone mute switch is independent of the Microphone Mute control in Logitech Gaming Software. -
Bass and Treble
Use the Bass and Treble sliders to adjust the bass and treble levels of the audio output. The incremental adjustments range from -12 db to +12 db.
NOTE: Bass and treble level controls cannot be adjusted when the Advanced Equalizer is enabled. -
Advanced Equalizer select
Click to show or hide the Advanced Equalizer control panel.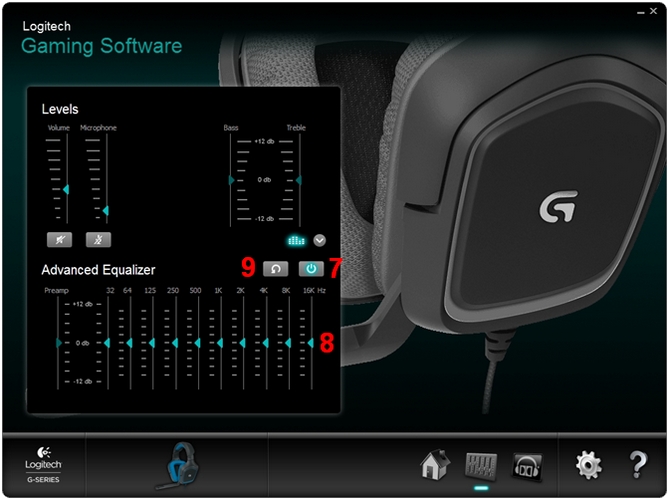
-
Advanced Equalizer button
Click the power button to enable or disable the Advanced Equalizer. The button will appear lit when the Advanced Equalizer is enabled.
NOTE: The power button and equalizer icon above the button will appear lit when the Advanced Equalizer is enabled. -
Advanced Equalizer settings
Use the sliders to fine-tune the settings of the G430's audio output on the 10-band equalizer. The Preamp slider will automatically adjust when manually configuring equalizer band levels.
NOTE: The Preamp setting cannot be adjusted manually. -
Advanced Equalizer reset
Click the reset button to reset the equalizer settings to their default state.
Customizing Surround Sound
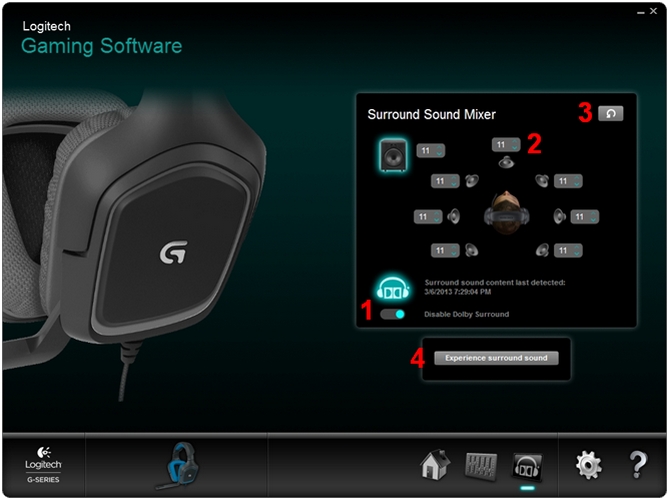
The Surround Sound panel allows you to adjust sound-source output levels for both stereo and Dolby® Surround sound.
-
Surround Sound switch
Click the switch to enable or disable Dolby® Surround in the Surround Sound Mixer.
NOTE: The Dolby® Headphone logo will appear lit when Dolby® Surround is enabled. -
Sound source volume settings
Click the up or down arrows to adjust the sound-source output levels. The incremental adjustments range from 0 to 11.
NOTE: Only left and right channel (stereo) sound-source output levels can be adjusted when Dolby® Surround is disabled. -
Surround Sound Mixer reset
Click the reset button to reset all sound-source level settings to their default state.
NOTE: Clicking the reset button will reset the sound-source settings for all channels, whether or not Dolby Surround® is enabled. -
Test Surround Sound
Click the Experience surround sound button to test the surround-sound-source configuration. A series of sounds will be output to the headset, each corresponding to an output channel in the Dolby® Surround 7.1 configuration.
TIP: Make your sound-source adjustments as the test is being conducted. You'll be able to hear the result of your adjustments in real-time as the test cycles through all the output channels.
Important Notice: The Firmware Update Tool is no longer supported or maintained by Logitech. We highly recommend using Logi Options+ for your supported Logitech devices. We are here to assist you during this transition.
Important Notice: The Logitech Preference Manager is no longer supported or maintained by Logitech. We highly recommend using Logi Options+ for your supported Logitech devices. We are here to assist you during this transition.
Important Notice: The Logitech Control Center is no longer supported or maintained by Logitech. We highly recommend using Logi Options+ for your supported Logitech devices. We are here to assist you during this transition.
Important Notice: The Logitech Connection Utility is no longer supported or maintained by Logitech. We highly recommend using Logi Options+ for your supported Logitech devices. We are here to assist you during this transition.
Important Notice: The Unifying Software is no longer supported or maintained by Logitech. We highly recommend using Logi Options+ for your supported Logitech devices. We are here to assist you during this transition.
Important Notice: The SetPoint software is no longer supported or maintained by Logitech. We highly recommend using Logi Options+ for your supported Logitech devices. We are here to assist you during this transition.
Frequently Asked Questions
There are no products available for this section
There are no Downloads for this Product
There are no Downloads for this Version
Compatible Product
