There are two ways you can configure the pointer settings for your gaming mouse. You can use:
NOTE: For help with choosing between application detection and on-board memory, see answer 360023247934.
Configuring pointer settings with application detection
The G600 gaming mouse supports these pointer customizations:
- DPI levels — Configure up to five from 200-8200 in 50 DPI increments.
- Report rate — Update from 125/sec (8ms response time) to 1000/sec (1ms response time).
- Per profile pointer settings — Enable different pointer behavior for each profile.
- Separate X/Y axis settings — Configure X and Y DPI levels independently.
- Acceleration — Enhance pointer precision.
To configure your pointer settings using application detection:
-
Open the Logitech Gaming Software:
Start > All Programs > Logitech > Logitech Gaming Software 8.x -
Enable Automatic Game Detection mode by clicking the toggle at the right side of the window.
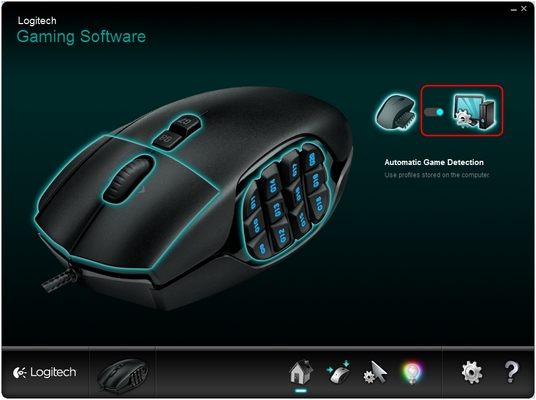
-
Click the pointer icon at the bottom of the window.

The Pointer Settings window will appear:
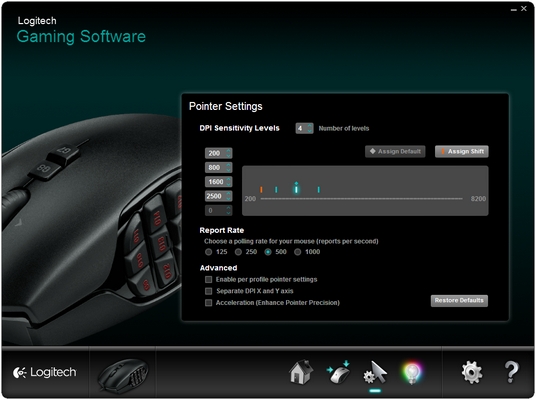
-
Under DPI Sensitivity Levels, drag the tick mark along the graph. For each DPI level you set, you'll see a tick mark. You can set up to five.
NOTE: If you prefer, you can edit the list of DPI values to the left of the graph from 200-8200. For each DPI level you set, you'll see a tick mark rounded to the nearest 50.
Example: If you type in "632", the software will round to 650DPI.-
Assign Default — (Required) One DPI level must always be the default. To change the default, click a DPI level that doesn't have a blue diamond above it, and then click Assign Default.
This is the DPI level the mouse will return to when you:- Press the default DPI button
- Switch between profiles
- Power up the computer
- Wake the computer from sleep mode
-
Assign Shift — (Optional) A Shift DPI is a DPI level you can temporarily activate by pressing the DPI Shift button. To set the Shift DPI, select a DPI level that isn't highlighted in orange, and then click Assign Shift. This enables extreme precision or mouse speed when needed. The mouse will revert back to the current DPI level when the button is released.
TIP: Buttons you assign as DPI Up, DPI Down and DPI Cycle will enable you to change between DPI levels rapidly.
-
-
Change the Report Rate, if you prefer something other than the default of 500 reports/second (2ms response time). This controls how often your mouse updates its position to the computer.
NOTE: The available range is from 125/sec (8ms response time) to 1000/sec (1ms response time). You can:- Decrease processor use by reducing the report rate.
- Increase the mouse response by raising the report rate.
TIP: For most PCs, a report rate of 500 is recommended.
-
Make your preferred selections under Advanced. The options are:
-
Enable per profile pointer settings - Select this option to enable each profile to have different pointer behavior (see answer 360023247934 for help).
TIP: We recommend leaving this unchecked for the initial setup. -
Separate DPI X and Y axis settings — Select this option to configure X and Y DPI levels independently.
TIP: We recommend leaving this unchecked for the initial setup. -
Acceleration (Enhance Pointer Precision) — Select this option to use Window's "Enhance Pointer Precision" acceleration.
TIP: For gaming accuracy, we recommend leaving this unchecked, but you can enable it if you prefer the feel of default Windows acceleration.
-
Enable per profile pointer settings - Select this option to enable each profile to have different pointer behavior (see answer 360023247934 for help).
Configuring pointer settings in on-board memory
To configure the pointer settings using on-board memory:-
Open the Logitech Gaming Software:
Start > All Programs > Logitech > Logitech Gaming Software 8.x -
Enable On-Board Memory mode by clicking the toggle at the right side of the window.
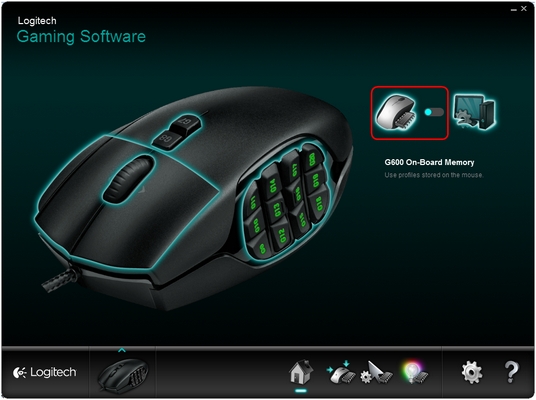
-
Click the pointer icon at the bottom of the window.

The screen will now change to show the pointer-configuration menu.
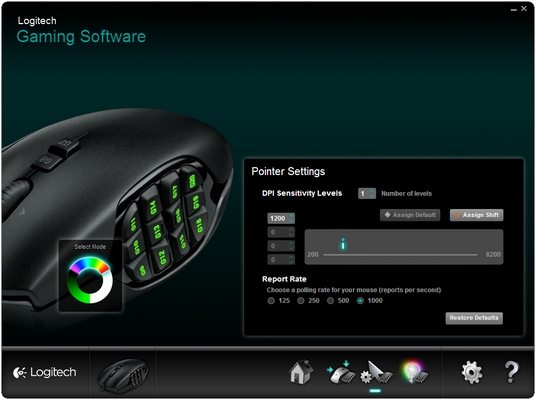
-
Choose the mode you want to configure on the Select Mode wheel.
NOTES:- The G600 has three modes you can select by clicking the different sections of the wheel.
- Each mode can have its own lighting, pointer settings, and button assignments.
- You can use any button assigned as the Mode Switch to change between modes (default is G8).
-
Under DPI Sensitivity Levels, you can set up to four DPI levels. To change the speed at each level, drag the tick mark to your desired DPI.
NOTE: If you prefer, you can edit the list of DPI values to the left of the graph from 200-8200. For each DPI level you set, you'll see a tick mark rounded to the nearest 50.Example: If you type in "632", the software will round to 650DPI.
-
Assign Default — (Required) One DPI level must always be the default. To change the default, click a DPI level that doesn't have a blue diamond above it, and then click Assign Default. This is the DPI level the mouse will return to when you:
- Press the default DPI button
- Switch between profiles
- Power up the computer
- Wake the computer from sleep mode
- Assign Shift — (Optional) A Shift DPI is a DPI level you can temporarily activate by pressing the DPI Shift button. To set the Shift DPI, select a DPI level that isn't highlighted in orange, and then click Assign Shift. This enables extreme precision or mouse speed when needed. The mouse will revert back to the current DPI level when the button is released.
TIP: Buttons you assign as DPI Up, DPI Down and DPI Cycle will enable you to change between DPI levels rapidly.
-
Assign Default — (Required) One DPI level must always be the default. To change the default, click a DPI level that doesn't have a blue diamond above it, and then click Assign Default. This is the DPI level the mouse will return to when you:
-
You can change the Report Rate by clicking a different "reports per section" option. The Report Rate controls how often your mouse updates its position to the computer. The possible range is from 125/sec (8ms response time) to 1000/sec (1ms response time).
You can:
- Decrease processor use by reducing the report rate
- Increase the mouse response by raising the report rate
Important Notice: The Firmware Update Tool is no longer supported or maintained by Logitech. We highly recommend using Logi Options+ for your supported Logitech devices. We are here to assist you during this transition.
Important Notice: The Logitech Preference Manager is no longer supported or maintained by Logitech. We highly recommend using Logi Options+ for your supported Logitech devices. We are here to assist you during this transition.
Important Notice: The Logitech Control Center is no longer supported or maintained by Logitech. We highly recommend using Logi Options+ for your supported Logitech devices. We are here to assist you during this transition.
Important Notice: The Logitech Connection Utility is no longer supported or maintained by Logitech. We highly recommend using Logi Options+ for your supported Logitech devices. We are here to assist you during this transition.
Important Notice: The Unifying Software is no longer supported or maintained by Logitech. We highly recommend using Logi Options+ for your supported Logitech devices. We are here to assist you during this transition.
Important Notice: The SetPoint software is no longer supported or maintained by Logitech. We highly recommend using Logi Options+ for your supported Logitech devices. We are here to assist you during this transition.
Frequently Asked Questions
There are no products available for this section
There are no Downloads for this Product
There are no Downloads for this Version
Compatible Product
