We recommend a fit based on how you plan to use your Jaybird X4 over-ear or under-ear.
If you intend to use Jaybird X4 for sport use we recommend Sport Fit Plus.
Sport Fit Plus enables you to set up the earbuds for an over-ear fit, which is designed for those wanting a great sports music experience.
For setup instructions, follow the steps below:
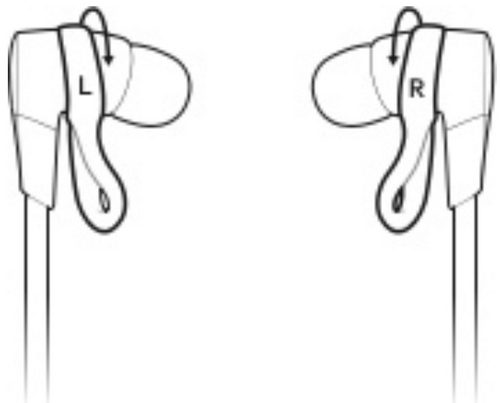
- Your X4 earbuds are fitted with size 1 (small) ear tips and size 2 (medium) ear fins out of the box. Firstly, lay your X4 in front of you with the inline remote on the left hand side. Swap the fins to the opposite side so the fin with the L is now on the side with the remote.

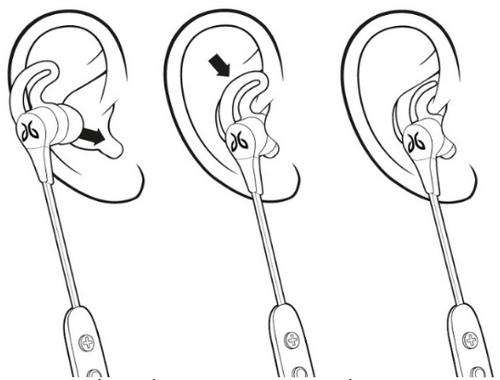
- Rotate the fins so they are pointing towards the cable.
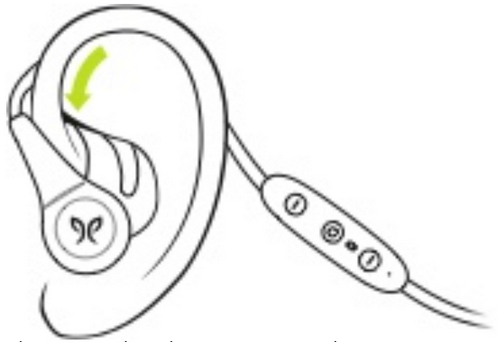
- Place your X4 over your ear with the inline remote on your left side as shown below.
- If your earbuds are not comfortable, or feel loose, try alternative sized tips and/or fins. Please take some time to get the perfect fit.
- You can also try the Comply Ultra foam tips or remove the fins completely.
- Follow the instructions in How to install, insert, and remove comply tips on my X4 earbuds?.
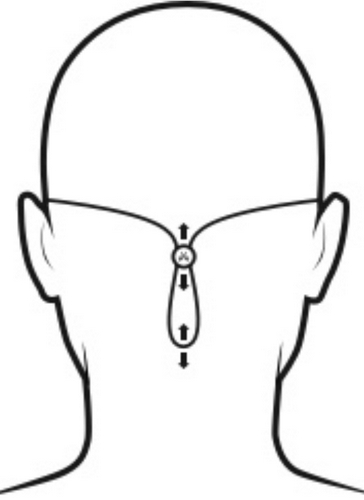
To adjust the cord cinch do the following:
- Put the X4 in your ears.
- Grab the cord beneath the cinch with one hand. With your other hand adjust the cinch up or down until you find the right cord length to get a snug fit with no excessive slack.
Once you are happy with the fit, you are good to go.
NOTE: Since the left/ right earbuds are switched now, you can switch the left/ right channel accordingly with the Jaybird App.
If you intend to use Jaybird X4 for casual use, we recommend the under-ear setup.
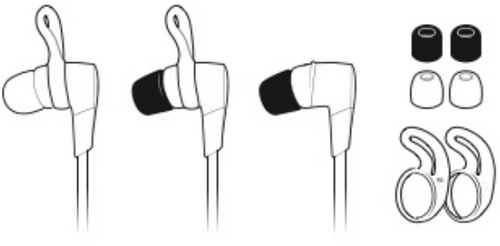
- Your X4 earbuds are fitted with size 1 (small) ear tips and size 2 (medium) ear fins out of the box. With the size 1 tips and size 2 fins attached, place these firmly within your ears, in the under-ear position, as shown below. The inline remote should be on the right side.
- If your earbuds are not comfortable, or feel loose, try alternative sized tips and/or fins. Please take some time to get the perfect fit.
- You can also try the Comply Ultra foam tips or remove the fins completely. Follow the instructions in How to install, insert, and remove comply tips on my X4 earbuds?.
- Once you are happy with the fit you can adjust the length of the cable with the attached speed cinch or included shirt clip.
To adjust the cord cinch do the following:
- Put the X4 in your ears.
- Grab the cord beneath the cinch with one hand. With your other hand adjust the cinch up or down until you find the right cord length to get a snug fit with no excessive slack.
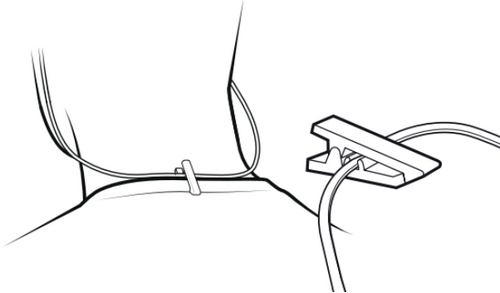
Use the included shirt clip to secure your X4 earbuds to the back of your shirt.
- Prior to using the shirt clip remove, if necessary, the cinch.
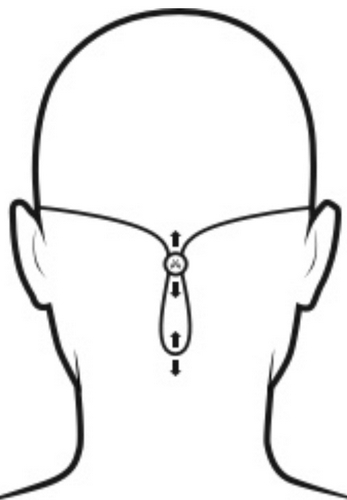
- Attach the shirt clip to the back of your shirt as shown in the illustration below.
Once you're happy with the fit, you're good to go.
중요 고지: Logitech은 펌웨어 업데이트 도구를 더 이상 지원하거나 유지보수하지 않습니다. 지원되는 Logitech 장치 에는 Logi Options+ 사용을 적극 권장합니다. 전환 과정에서 도움이 필요하시면 언제든지 도와드리겠습니다.
중요 고지: Logitech은 Logitech Preference Manager를 더 이상 지원하거나 유지보수하지 않습니다. 지원되는 Logitech 장치에는 Logi Options+ 사용을 적극 권장합니다. 전환 과정에서 도움이 필요하시면 언제든지 도와드리겠습니다.
중요 고지: Logitech은 Logitech Control Center를 더이상 지원하거나 유지보수하지 않습니다. 지원되는 Logitech 장치에는 Logi Options+ 사용을 적극 권장합니다. 전환 과정에서 도움이 필요하시면 언제든지 도와드리겠습니다.
중요 고지: Logitech은 Logitech Connection Utility를 더이상 지원하거나 유지보수하지 않습니다. 지원되는 Logitech 장치에는 Logi Options+ 사용을 적극 권장합니다. 전환 과정에서 도움이 필요하시면 언제든지 도와드리겠습니다.
중요 고지: Unifying 소프트웨어는 더 이상 Logitech에서 지원하거나 유지보수하지 않습니다. 지원되는 Logitech 장치에는 Logi Options+를 사용하는 것을 적극 권장합니다. 전환 과정에서 도움이 필요하시면 언제든지 도와드리겠습니다.
중요 고지: Logitech은 SetPoint 소프트웨어를 더 이상 지원하지 않습니다. 지원되는 Logitech 장치에는 Logi Options+ 사용을 적극 권장합니다. 전환 과정에서 도움이 필요하시면 언제든지 도와드리겠습니다.
FAQ(자주 묻는 질문)
이 섹션에 사용할 수있는 제품이 없습니다
이 제품에 대한 다운로드가 없습니다.
이 버전에 대한 다운로드가 없습니다.
Compatible Product
