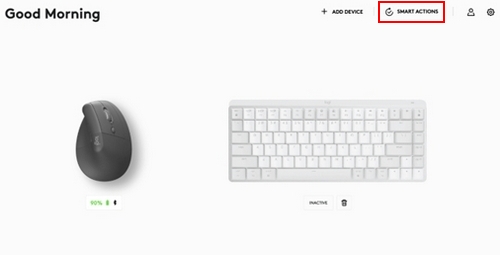
หมายเหตุ: คุณต้องติดตั้งแอป Options+ เอาไว้เพื่อสร้าง Smart Actions หากคุณไม่ได้ติดตั้ง Options+ ไว้ คุณสามารถดาวน์โหลดเวอร์ชันล่าสุดได้ที่นี่
คุณต้องมีอุปกรณ์ที่ตั้งค่า Options+ เอาไว้อย่างน้อยหนึ่งเครื่องจึงจะใช้งาน Smart Actions ได้ หากต้องการความช่วยเหลือ โปรดดูฉันจะเชื่อมต่ออุปกรณ์เข้ากับคอมพิวเตอร์อย่างไร
เมื่อคุณเปิด Options+ คุณจะเห็น Smart Actions ที่มุมขวาบนของหน้าต่าง

คลิก Smart Actions คุณจะเห็นว่าเราได้สร้างแม่แบบไว้ช่วยคุณเริ่มต้นใช้งานแล้ว นอกจากนี้ คุณยังจะเห็นตัวเลือกให้ Create (สร้าง) หรือ Import (นำเข้า) Smart Actions อีกด้วย

ตัวอย่าง:
ในแม่แบบ Meeting Mode (โหมดการประชุม) ให้คลิกGet (รับ) คุณจะเห็นความสามารถในการกำหนดทริกเกอร์และการดำเนินการ
- ทริกเกอร์ — นี่คือจุดเริ่มต้นของการดำเนินการ
- การดำเนินการ — ลำดับของงานที่จะทำ

ปัจจุบันทริกเกอร์มีสองประเภทดังนี้
อุปกรณ์ — ช่วยให้คุณเริ่ม Smart Actions ได้โดยใช้ปุ่มเมาส์หรือปุ่มคีย์บอร์ด Logitech
ปุ่มลัด— ช่วยให้คุณเริ่ม Smart Actions ได้โดยใช้การผสมผสานปุ่ม โดยต้องมีปุ่มตัวปรับแต่ง (Ctrl, Shift, Cmd หรือ Opt) และอีกตัวหนึ่ง
ในตัวอย่างนี้ เมาส์ Logitech LIFT จะปรากฏขึ้น เลือกปุ่มที่คุณต้องการใช้

เมื่อคุณยืนยันทริกเกอร์ คุณจะมีตัวเลือกให้อัปเดตลำดับการดำเนินการ มาเพิ่มการดำเนินการใหม่เพื่อเปิด Slack กัน บ่อยครั้งที่รายการได้รับการแชร์ผ่าน Slack ขณะอยู่ในการประชุม

คุณจะเห็นว่าเราได้เพิ่มขั้นตอนในการเปิด Google Chrome, เพิ่มแท็บเบราว์เซอร์ใหม่ แล้วเพิ่ม Slack
คลิกยืนยัน คุณก็พร้อมแล้ว!
การใช้ทริกเกอร์ปุ่มลัด
คุณสามารถบันทึกการกดปุ่มเพื่อสร้างทริกเกอร์ปุ่มลัดได้ เลือกปุ่มลัดใต้ทริกเกอร์และป้อนการผสมผสานปุ่ม ในตัวอย่างนี้ Shift และ M จะเป็นการเรียกใช้ Smart Actions ของโหมดการประชุม

คำถามที่พบบ่อย
ไม่มีสินค้าสำหรับส่วนนี้
