GEDETAILLEERDE INSTELLING
- Zorg ervoor dat de muis is ingeschakeld - de led bij het cijfer 1 aan de onderkant van de muis moet snel knipperen.
NB: Als de led niet snel knippert, druk dan lang (drie seconden). - Kies hoe je wilt verbinden:
-
De meegeleverde draadloze USB-ontvanger gebruiken
Sluit de ontvanger aan op een USB-poort van de computer. -
Direct verbinden via Bluetooth
Open de Bluetooth-instellingen op de computer om het koppelen te voltooien.
Klik hier voor meer informatie over hoe je dit op de computer doet. Als je problemen ondervindt met Bluetooth, klik dan hier voor het oplossen van problemen met Bluetooth.
-
De meegeleverde draadloze USB-ontvanger gebruiken
- Installeer de Logi Options+-software.
Download Logi Options+ om alle mogelijkheden van deze muis te gebruiken. Om Logi Options+ te downloaden en meer te weten te komen, ga je naar logi-options-plus.
Koppelen met een tweede computer met Easy-Switch
De muis kan met behulp van de Easy-Switch-knop aan maximaal drie verschillende computers worden gekoppeld om van kanaal te wisselen.
- Met een korte druk op de Easy-Switch-knop kun je van kanaal wisselen. Selecteer het gewenste kanaal en ga naar de volgende stap.
- Houd de Easy-Switch-knop drie seconden ingedrukt. Hierdoor wordt het toetsenbord in de vindbare modus geplaatst zodat het door je computer kan worden gezien. De led knippert nu snel.
- Kies hoe je het toetsenbord met de computer wilt verbinden:
- Bluetooth: Open de Bluetooth-instellingen op de computer om het koppelen te voltooien. Hier vind je meer informatie.
- USB-ontvanger: Sluit de ontvanger aan op een USB-poort en open Logi Options+. Selecteer in Options+ Apparaten toevoegen > Installatie Unifying-apparaat en volg de instructies.
Je kunt Easy-Switch nu configureren vanuit de Actions Ring en twee Logitech-apparaten tegelijkertijd wisselen. Raadpleeg dit artikel voor gedetailleerde instructies voor hoe je Easy-Switch instelt in de Actions Ring.
MEER INFORMATIE OVER HET PRODUCT
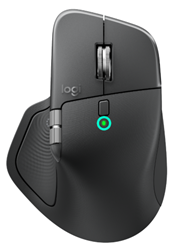
Productoverzicht
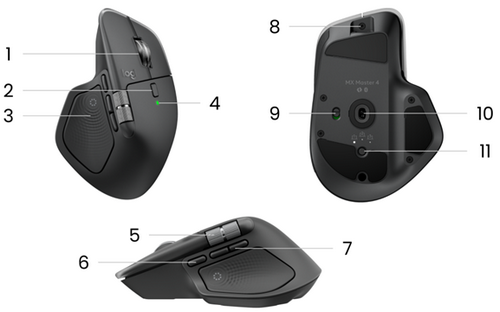
|
1 - MagSpeed-scrolwiel |
6 - Gebarenknop |
|
2 - Knop Modusschakelaar voor het scrolwiel |
7 - Knoppen Volgende/Vorige |
|
3 - Haptic Sense-paneel |
8 - USB-C-oplaadpoort |
|
4 - Led voor batterijstatus |
9 - Aan-uitknop |
|
5 - Duimwiel |
10 - 8000 DPI-sensor |
|
|
11 - Easy-Switch- en verbindingsknop |
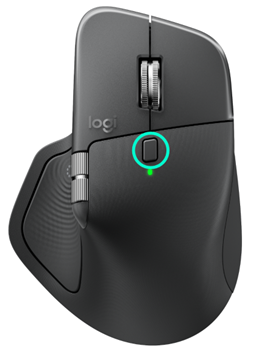
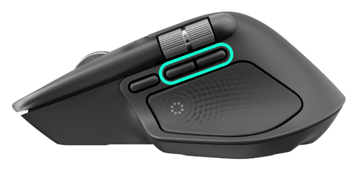
Paneel Haptisch gevoel
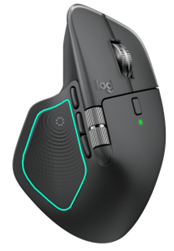
Het nieuwe Haptic Sense-paneel heeft twee functies:
- Ingebouwde, aanpasbare haptische feedback voor intuïtieve en nauwkeurige controle. Klik hier voor informatie over hoe je haptische feedback aanpast.
- Als je op het Haptic Sense-paneel klikt, wordt de Actions Ring geopend en krijg je toegang tot je favoriete snelkoppelingen. Klik hier voor gedetailleerde instructies voor hoe je de Actions Ring instelt.
OPMERKING: Je hebt Logi Options+ nodig om de Actions Ring te kunnen gebruiken.
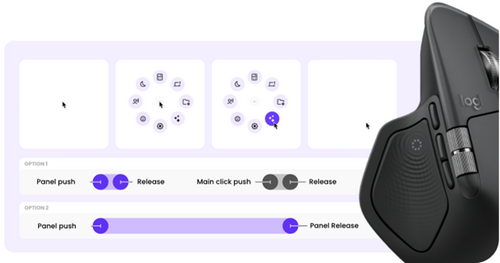
Je kunt een cirkel op de Actions Ring op twee manieren selecteren:
- Optie 1: Druk op het Haptic Sense-paneel en laat het los → De Actions Ring wordt geopend → Houd de cursor op een cirkel en klik met de linkermuisknop.
- Optie 2: Druk op het Haptic Sense-paneel zonder los te laten → Houd de cursor op een cirkel → Laat los op de cirkel.
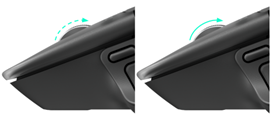
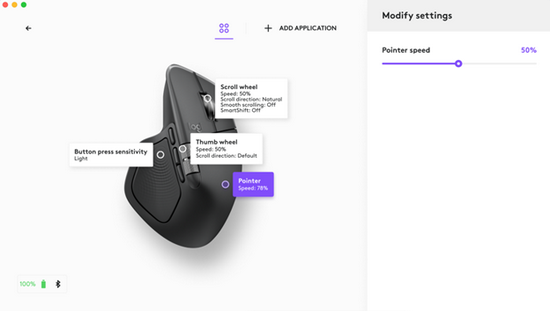
Adaptief MagSpeed-scrolwiel
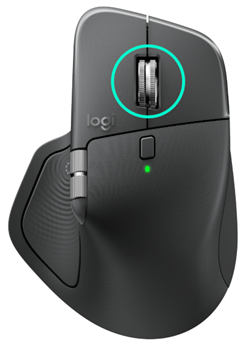
Het in snelheid instelbare scrolwiel schakelt automatisch tussen twee scrolmodi. Naarmate je sneller scrolt, schakelt het automatisch van modus regel voor regel scrollen naar vrij draaien.
- Modus regel-voor-regel (of 'ratchet'): ideaal voor precieze navigatie door artikelen en lijsten.
- Modus supersnel (vrij draaien): vrijwel wrijvingsloos draaien waardoor je door lange documenten en webpagina's vliegt.
Handmatig tussen modi schakelen
Je kunt ook handmatig tussen modi schakelen door op de knop voor moduswijziging te drukken.
Moduswijziging is standaard toegewezen aan de knop boven op de muis.
Gebruik de Logi Options+-software om SmartShift uit te schakelen als je liever in één scrolmodus blijft en handmatig wilt schakelen. Je kunt ook de SmartShift-gevoeligheid aanpassen, waardoor de snelheid wordt gewijzigd die nodig is om automatisch naar vrij draaien te schakelen.
Je kunt ook de scrolkracht aanpassen.

Duimwiel
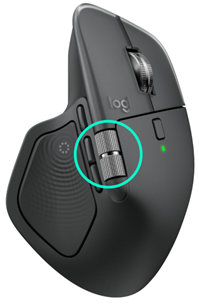
Scrol moeiteloos horizontaal met een duw van je duim.
Installeer de Logi Options+-software om onder andere de functies van het duimwiel uit te breiden:
- Pas de scrolsnelheid en richting van het duimwiel aan
- Schakel app-specifieke instellingen in voor het duimwiel:
- Zoom in Microsoft Word en PowerPoint
- Pas de penseelgrootte aan in Adobe Photoshop
- Loop door je tijdlijn in Adobe Premiere Pro
- Schakel tussen tabbladen in de browser
- Stel het volume bij
- Wijs aangepaste toetsaanslagen toe aan de wielrotatie (omhoog en omlaag)
Bewegingsknop
Installeer de Logi Options+-software om gebaren in te schakelen.
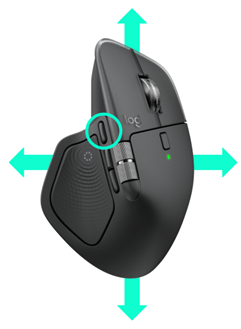
De bewegingsknop gebruiken:
Houd de bewegingsknop ingedrukt terwijl je de muis naar links, rechts, omhoog of omlaag beweegt.
|
Bewegingsknop |
|
Windows 10 |
|
macOS |
|
Eenmaal drukken |
O |
Taakweergave |
O |
Mission Control |
|
Ingedrukt houden en omlaag bewegen |
↓ |
Bureaublad weergeven/verbergen |
↓ |
Mission Control |
|
Ingedrukt houden en omhoog bewegen |
↑ |
Start-menu |
↑ |
App Expose |
|
Ingedrukt houden en naar rechts bewegen |
→ |
Schakel tussen bureaubladen |
→ |
Schakel tussen bureaubladen |
|
Ingedrukt houden en naar links bewegen |
← |
Schakel tussen bureaubladen |
← |
Schakel tussen bureaubladen |
Je kunt gebaren gebruiken voor desktopnavigatie, app-beheer, pannen, zoomen en meer. Je kunt tot vijf verschillende acties toewijzen aan de knop Gebaren. Je kunt gebaren ook toekennen aan andere knoppen van de MX Master 4, zoals de middelste knop of de knop voor handmatig schakelen.
Knoppen Vorige/Volgende
De handig geplaatste knoppen Vorige en Volgende verbeteren navigatie en vereenvoudigen taken.
Achteruit en vooruit gaan:
- Druk op de knop Vorige of Volgende om te navigeren op web- of documentpagina's, afhankelijk van de locatie van de muisaanwijzer.
OPMERKING: Om op een Mac de knoppen Vorige/Volgende in te schakelen, moet je Logi Options+-software installeren.
Installeer de Logi Options+-software om nieuwe mogelijkheden voor de knoppen Vorige/Volgende te ontgrendelen.
Met de Logi Options+-software kun je niet alleen de knoppen voor gebruik op een Mac inschakelen, maar ook andere handige functies aan de knoppen toewijzen, zoals ongedaan maken/opnieuw uitvoeren, navigeren in het besturingssysteem, in-/uitzoomen en volume omhoog/omlaag.
8000 DPI-sensor
Installeer de Logi Options+-software om de nieuwe mogelijkheden van de Darkfield 8000 DPI-sensor in te schakelen
De MX Master 4 heeft standaard een configuratie van 1000 DPI.
In de Logi Options+-software kun je het sensorbereik uitbreiden tot 8000 dpi.
Als je deze optie inschakelt, kun je sneller en nauwkeuriger werken en kun je de aanwijzersnelheid aanpassen aan beeldschermen met een hoge resolutie.
App-specifieke instellingen
De muisknoppen kunnen worden toegewezen om verschillende functies voor verschillende apps uit te voeren. Je kunt bijvoorbeeld het duimwiel toewijzen voor horizontaal scrollen in Microsoft Excel en inzoomen in Microsoft PowerPoint.
Als je Logi Options+ installeert, kun je vooraf gedefinieerde, app-specifieke instellingen installeren waarmee het gedrag van de muisknop voor bepaalde apps wordt geoptimaliseerd.
Dit zijn de app-specifieke instellingen die al op de muis zelf beschikbaar zijn (scrol naar beneden voor meer informatie over de app-specifieke aanpassingen van Actions Ring):

|
|
1 |
2 |
3 |
|
Standaardinstellingen |
Middelste knop |
Horizontaal scrollen |
Terug/vooruit |
|
Browser |
Link in een nieuw tabblad openen |
Wisselen tussen tabbladen |
Terug/vooruit |
|
Microsoft Excel |
Pannen (Muis ingedrukt houden) |
Horizontaal scrollen |
Ongedaan maken/Opnieuw |
|
Microsoft Word |
Pannen (Muis ingedrukt houden) |
Zoomen |
Ongedaan maken/Opnieuw |
|
Microsoft PowerPoint |
Pannen (Muis ingedrukt houden) |
Zoomen |
Ongedaan maken/Opnieuw |
|
Adobe Photoshop |
Pannen (Muis ingedrukt houden) |
Grootte penseel |
Ongedaan maken/Opnieuw |
|
Adobe Premiere Pro |
Pannen (Muis ingedrukt houden) |
Navigeren over horizontale tijdlijn |
Ongedaan maken/Opnieuw |
|
Apple Final Cut Pro |
Pannen (Muis ingedrukt houden) |
Navigeren over horizontale tijdlijn |
Ongedaan maken/Opnieuw |
Met deze instellingen behouden de knop Gebaren en de knop voor wisselen van wielmodus dezelfde functionaliteit in alle applicaties.
Elk van deze instellingen kan handmatig worden aangepast voor elke app.
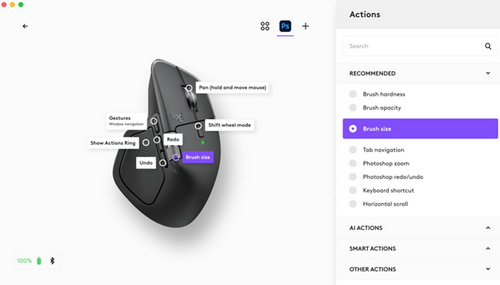
Lees dit artikel als je de Actions Ring in je favoriete apps wilt aanpassen.
Flow
Met Logitech Flow kun je met één MX Master 4 op meerdere computers werken.
Met Logitech Flow kun je de muiscursor van de ene naar de andere computer bewegen. Je kunt zelfs tussen verschillende computers kopiëren en plakken en met een compatibel Logitech-toetsenbord, zoals de MX Mechanical, kan het toetsenbord de muis volgen en tegelijkertijd tussen computers omschakelen.
Je moet de Logi Options+-software op beide computers installeren en deze instructies volgen.
Batterij
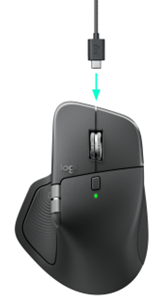
De batterij van de muis opladen:
Sluit het ene uiteinde van de oplaadkabel aan op de USB-C-poort van de muis en het andere uiteinde op een USB-stroombron.
Minimaal drie minuten snel opladen levert voldoende vermogen voor een hele dag. Afhankelijk van hoe je de muis gebruikt, kan een volledige oplading tot 70 dagen meegaan.
NB: Batterijlevensduur kan variëren, afhankelijk van gebruikers- en gebruiksomstandigheden.
Batterijstatus van de muis controleren:
De led boven op de muis geeft de batterijstatus aan.
Installeer de Logi Options+-software om meldingen over de batterijstatus te ontvangen, inclusief waarschuwingen bij laag vermogen.
|
Led-kleur |
Betekenis |
|
Groen |
Van 100% tot 10% opgeladen |
|
Rood |
10% opgeladen of minder |
|
Knippert groen |
Tijdens het opladen |
Je apparaat schoonmaken
Lees dit artikel voor informatie over hoe je je apparaat schoonmaakt.
Belangrijke mededeling: De firmware-updatetool wordt niet meer ondersteund of onderhouden door Logitech. We raden u ten zeerste aan om Logi Options+ te gebruiken voor ondersteunde Logitech-apparaten. We zijn er om u te helpen tijdens deze overgang.
Belangrijke mededeling: De Logitech Preference Manager wordt niet meer ondersteund of onderhouden door Logitech. We raden u ten zeerste aan om Logi Options+ te gebruiken voor ondersteunde Logitech-apparaten. We zijn er om u te helpen tijdens deze overgang.
Belangrijke mededeling: Het Logitech Control Center wordt niet meer ondersteund of onderhouden door Logitech. We raden u ten zeerste aan om Logi Options+ te gebruiken voor ondersteunde Logitech-apparaten. We zijn er om u te helpen tijdens deze overgang.
Belangrijke mededeling: Het Logitech-verbindingshulpprogramma wordt niet meer ondersteund of onderhouden door Logitech. We raden u ten zeerste aan om Logi Options+ te gebruiken voor ondersteunde Logitech-apparaten. We zijn er om u te helpen tijdens deze overgang.
Belangrijke mededeling: De Unifying-software wordt niet meer ondersteund of onderhouden door Logitech. We raden u ten zeerste aan om Logi Options+ te gebruiken voor ondersteunde Logitech-apparaten. We zijn er om u te helpen tijdens deze overgang.
Belangrijke mededeling: De SetPoint-software wordt niet meer ondersteund of onderhouden door Logitech. We raden u ten zeerste aan om Logi Options+ te gebruiken voor ondersteunde Logitech-apparaten. We zijn er om u te helpen tijdens deze overgang.
Veelgestelde vragen
Er zijn geen producten beschikbaar voor deze sectie
Er zijn geen downloads voor dit product
Er zijn geen downloads voor deze versie.
Compatible Product
