MX Keys Wireless Illuminated Keyboard
QUICK SETUP
For quick interactive setup instructions, go to the interactive setup guide.
For more detailed information, continue with the following detailed setup guide.
DETAILED SETUP
- Make sure the keyboard is turned on.
The number 1 LED on the keyboard should blink quickly.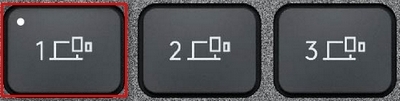
NOTE: If the LED is not blinking quickly, perform a long press (three seconds). - Choose how you want to connect:
- Use the included wireless receiver.
Plug the receiver into a USB port on your computer. - Connect directly via Bluetooth.
Open the Bluetooth settings on your computer to complete the pairing.
Click here for more details on how to do this on your computer. If you experience issues with Bluetooth, click here for Bluetooth troubleshooting.
- Use the included wireless receiver.
- Install Logi Options+ Software.
Download Logi Options+ to enable additional features. To download and learn more go to logitech.com/optionsplus.
LEARN MORE ABOUT YOUR PRODUCT
Product Overview
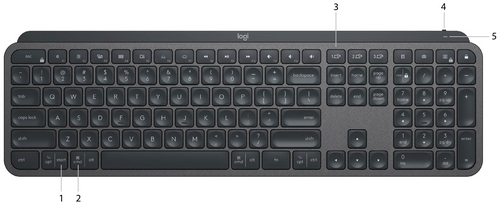
1 - PC layout
2 - Mac layout
3 - Easy-Switch keys
4 - ON/OFF switch
5 - Battery status LED and ambient light sensor
Pair to a second computer with Easy-Switch
Your keyboard can be paired with up to three different computers using the Easy-Switch button to change the channel.
- Select the channel you want and press and hold the Easy-Switch button for three seconds. This will put the keyboard in discoverable mode so that it can be seen by your computer. The LED will start blinking quickly.
- Connect your keyboard to your computer using Bluetooth or the USB receiver:
- Bluetooth: Open the Bluetooth settings on your computer to complete the pairing. You can find more information here.
- USB receiver: Plug the receiver into a USB port, open Logi Options+, select: Add devices > Setup Unifying device, and follow the instructions.
- Once paired, a short press on the Easy-Switch button will allow you to switch channels.
INSTALL SOFTWARE
Download Logi Options+ to use all the possibilities this keyboard has to offer. To download and learn more about the possibilities, go to logitech.com/optionsplus.
Logi Options+ is compatible with Windows and Mac.
Multi-OS keyboard
Your keyboard is compatible with multiple operating systems (OS): Windows 10 and later; macOS 12 and later.
If you are a Windows user, the special characters will be on the right side of the key:

If you are a macOS user, the special characters and keys will be on the left side of the keys:

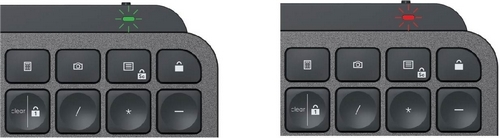
Battery Status Notification
Your keyboard will let you know when it is running low. From 100% to 11% your LED will be green. From 10% and below, the LED will be red. You can continue typing for more than 500 hours without backlighting when the battery is low.
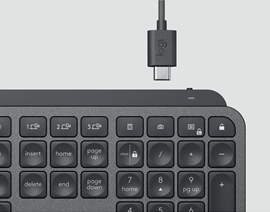
Plug the USB-C cable at the top right corner of your keyboard. You can continue typing while it is charging.
Smart backlighting
Your keyboard has an embedded ambient light sensor that reads and adapts the level of backlighting accordingly.
|
Room brightness |
Backlight level |
|
Low light - under 100 lux |
L2 - 25% |
|
Mid light - between 100 and 200 lux |
L4 - 50% |
|
High light - over 200 lux |
L0 - no backlight* |
*Backlight is turned OFF.
There are eight backlight levels.
You can change the backlight levels at any time, with two exceptions: the backlight cannot be turned ON when the room brightness is high, or the keyboard battery is low.
Software notifications
Install Logi Options+ software to get the most out of your keyboard.
Click here for more information.
-
Backlight level notifications
Change the backlight level and to know in real-time what level you have.
-
Backlighting disabled
There are two factors that will disable backlighting:
When your keyboard has only 10% of the battery left when you try to enable backlighting, this message will appear. If you want the backlight back, plug in your keyboard to charge.
When the environment around you is too bright, your keyboard will automatically disable backlighting to avoid using it when unnecessary. This will also allow you to use it longer with backlight in low-light conditions. You will see this notification when you try to turn backlighting ON. -
Low battery
When your keyboard reaches 10% of battery left, backlighting turns OFF and you get a battery notification on the screen.
-
F-Keys switch
Press Fn + Esc to swap between Media keys and F-Keys. We’ve added a notification to let you know you’ve swapped.
NOTE: By default, the keyboard has direct access to Media Keys.
Logitech Flow
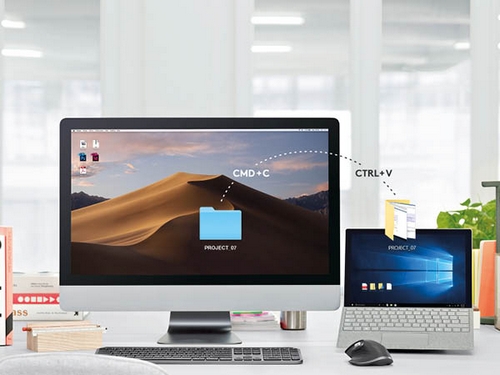
You can work on multiple computers with your MX Keys keyboard. With a Flow-enabled Logitech mouse, such as MX Master 3S, you can work and type on various computers with the same mouse and keyboard using Logitech Flow technology.
You can use the mouse cursor to move from one computer to another. MX Keys keyboard will follow the mouse and switch computers simultaneously. You can even copy and paste between computers. You must install Logi Options+ software on both computers and follow these instructions.
You can check which other mice are Flow-enabled here.
Set up MX Anywhere 2S Wireless Mouse
GETTING STARTED
 |
Step One Download Logi Options+ to use all the possibilities this mouse has to offer. To download and learn more about the possibilities go to logitech.com/options+. |
 |
Step Two Turn your mouse on. |
 |
Step Three This mouse allows you to use it with up to three different computers. Just use the Easy-Switch™ button to change the channel. Select the channel you want and go to the next step. |
 |
Step Four To connect your mouse to your computer press the Easy-Switch™ button for 3 seconds. When it blinks fast it means it's in discoverable mode. |
 |
Step Five Choose if you want to pair with Bluetooth or with the provided Unifying receiver. |
Product Overview
MX ANYWHERE 2S AT A GLANCE
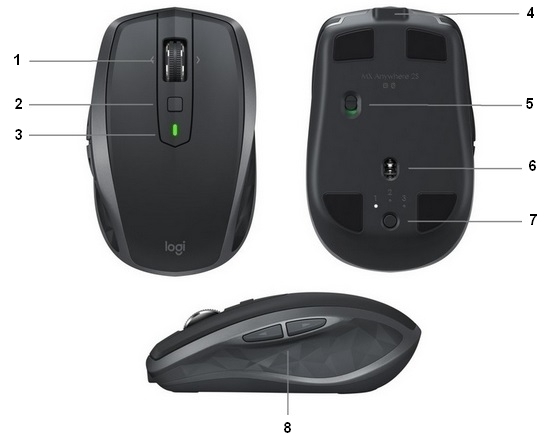
| 1 – Scroll wheel | 5 – On/Off button |
| 2 – Middle button | 6 – Darkfield high precision sensor |
| 3 – Battery status LED | 7 – Connect and Easy-Switch button |
| 4 – Micro USB port | 8 – Back/forward buttons |
Features:
Hyperfast scrolling
Press down on the wheel to switch between two scrolling modes: hyperfast and click-to-click.

In hyperfast mode you’ll fly through documents and web pages with a single spin. Click-to-click scrolling ratchets the wheel, giving you the precision you need for navigating lists, slides, and images.
Logi Options+
Install Logi Options+ to optimize the scrolling experience.
- Enable smooth scrolling
- Switch scrolling direction
- Adjust scrolling speed (Mac only)
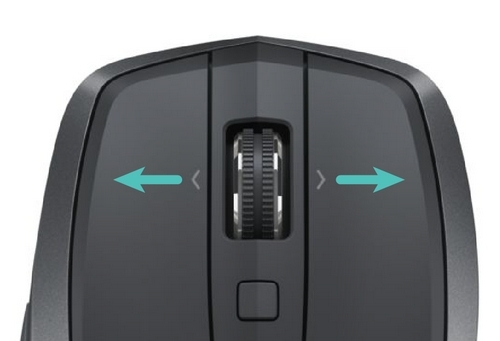
Horizontal scrolling
Scroll wide documents and web pages by tilting the wheel right or left.
Use Logi Options+ software to:
- Adjust scrolling speed
- Invert horizontal scrolling direction
- Assign another action to the tilt wheel
Back/forward button
Conveniently located back and forward buttons enhance navigation and simplify tasks.
Use Logi Options+ software to activate the back/forward buttons (on a Mac) and assign other actions to the buttons.
NOTE: On a Windows computer, this feature is available right out of the box.
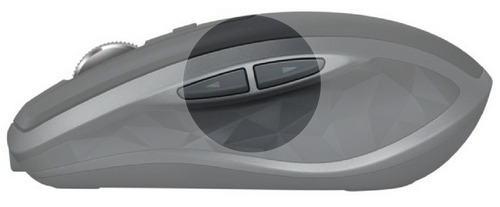
Gestures
Installing Logi Options+ transforms the middle button into a gesture button you can use to trigger gestures that simplify desktop and application management, media control, document viewing, and personalization of common tasks.
To perform a gesture:
- Hold down the middle button while moving the mouse left, right, up, or down.
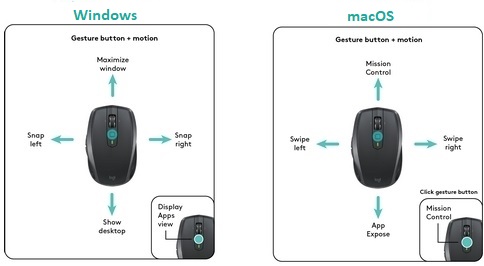
The figure below shows gesture sets available for managing windows in Windows (10 and later) and macOS (12 and later).
TIP: Use Logi Options+ to view available gesture sets and assign gestures to the middle button or to other mouse controls.
Battery
Check battery level:
- The LED on top of the mouse turns red to indicate that battery power is low and it’s time to change batteries.
After glowing green for 5 seconds when the mouse is powered on or waking from sleep, the LED indicates battery status.
| Color | Status |
| Green | 20-100% charge |
| Red | Less than 20% charge Recharge now! |
TIP: Install Logi Options+ to set up and receive battery status notifications.
To recharge MX Anywhere 2S:
- Connect one end of the provided charging cable to the Micro-USB port on the mouse and the other end to a USB power source.
The LED blinks slowly until fully charged, when it is lit steadily. (The LED shuts off when you remove the cable.)
One minute of charging gives you enough power for two hours of use. Depending on how you use the mouse, a full charge can last up to 70 days.*
* Based on eight hours of daily use. Battery life may vary depending on user and operating condition.
重要須知:韌體更新工具不再由 Logitech 支援或維護。我們強烈建議為支援的 Logitech 裝置使用 Logi Options+。在此過渡期間,我們會隨時為您提供協助。
重要須知:Logitech Preference Manager 已不再由 Logitech 支援或維護。我們強烈建議為支援的 Logitech 裝置使用 Logi Options+。在此過渡期間,我們會隨時為您提供協助。
重要須知:Logitech Control Center 已不再由 Logitech 支援或維護。我們強烈建議為支援的 Logitech 裝置使用 Logi Options+。在此過渡期間,我們會隨時為您提供協助。
重要須知:Logitech Connection Utility 已不再由 Logitech 支援或維護。我們強烈建議為支援的 Logitech 裝置使用 Logi Options+。在此過渡期間,我們會隨時為您提供協助。
重要須知:Unifying Software 已不再由 Logitech 支援或維護。我們強烈建議為支援的 Logitech 裝置使用 Logi Options+。在此過渡期間,我們會隨時為您提供協助。
重要須知:羅技不再支援或維護 SetPoint 軟體。我們強烈建議為支援的 Logitech 裝置使用 Logi Options+。在此過渡期間,我們會隨時為您提供協助。
常見問答集
沒有適用於此區段的產品
沒有適用於此產品的下載項目
沒有適用於此版本的下載項目。
Compatible Product
